 This is the first of my recent pattern purchases to be made up into a finished garment. I chose this one because it looked quick and easy – no zipper, no buttonholes, no real fitting!
However, it took longer than it should have – mainly because of user error!
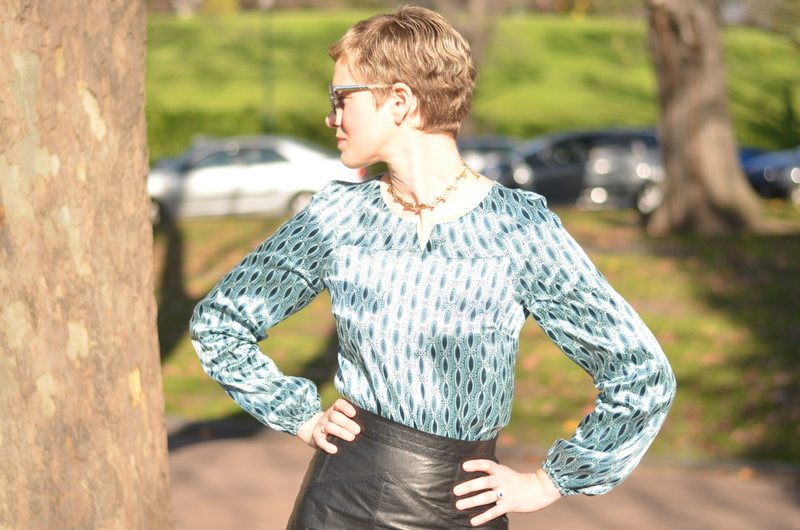
The fabric I chose was something I’ve had sitting around for years. I bought it when Darn Cheap Fabrics in Newport was still in existence, and when I was still a student. This combination of store name and my own limited student finances means that, even though at the time I felt it was an extravagant and ‘special’ purchase – it is silk after all – it turns out the quality of the fabric isn’t that great. However, I couldn’t part with it, and it actually made it easier for me to hack into it once I realised that it didn’t matter too much if I stuffed the whole thing up. And I still love the colours.
I decided to line the upper yoke/sleeve part in just a plain thin silk lining I had kicking around from a previous project. This worked out fine, although some of it peeks out a tiny bit around the neckline facing which annoys me slightly, but I can live with that. It’s not too terrible.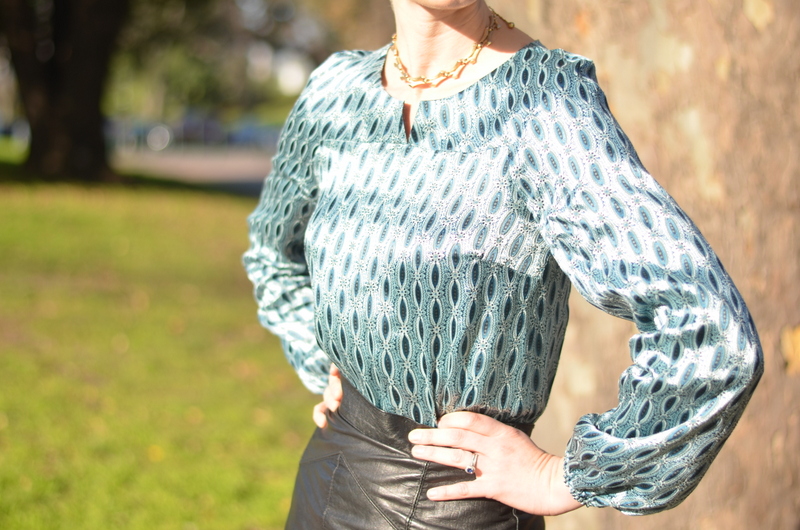
I made the usual depressing size alterations – size 8 bust/sleeve, tapering out the side seams to a whopping size 12 by the time I get to the hips.
I started out thinking that I would do the whole thing properly and commit to french seams – at least for the side seams. But I wasn’t sure if I would have to take it in anywhere, and I just couldn’t face the prospect of french seaming everything, and attaching the top half of the top, only to have to unppick it all to readjust the fit. So I ended up being lazy and overlocking the edges to stop the fraying. Lately I’ve noticed that lots of people spend the time and effort doing beautiful seam finishes on their garments (binding, french seaming etc), and I really wish I could be one of those types of sewers. It puts the insides of my garments to shame.
Things were going along swimmingly, until I got to the part where I was meant to turn through the lining for the yoke/sleeve section. The instructions just say ‘turn’, and my poor little brain just couldn’t figure out HOW to turn it through. I ended up with this hideous tangle of sleeves, but for the life of me, I couldn’t get it to turn through. I’m sure there must be a way, but I was tired and impatient and I just couldn’t figure out the logic to make it work. Grumpy and defeated, I ended up unpicking the lower sleeve hem (where the sleeve is joined to the lining right sides together) and instead cut out a rectangle of the fashion fabric to make a little cuff that would be the casing for the elastic. This worked out fine, but the slippery fabric made this a little more fiddly and messy to deal with. Then, of course, I couldn’t find a safety pin small enough to fit through the tiny channels for the elastic, so I spent a very long time trying to feed the elastic through using various other articles. Once I had done that and tried it on, I realised that in one of the arms, the sleeve lining and somehow twisted. More unpicking!
 The rest of the garment went together pretty easily. At the end, the inside of the top looked so messy around the armholes and where the yoke joined the body of the top, I had to do something. I felt that the bias binding I had on hand would be too stiff and bulky for the fabric used to use as a binding, so instead I improvised and decided to use the seam allowance of the black lining to wrap around the other seam allowances and act as a binding to encase all the raw edges. I hand stitched this around the armholes and yoke seams, and although it’s not perfect, it’s a whole lot better, and definitely worth the little bit of extra time. Because I had already clipped into the corners where the needle pivots around corners, these edges aren’t perfectly neatened on the inside, but it’s better than nothing.
All in all, I’m generally happy with the result. It’s not an amazing, show-stopping pattern, so neither is the finished product. (I wore it to work and it went through the day unnoticed by friends and colleagues), but it’s comfortable and the fabric feels nice against the skin. It’s a useful basic wardrobe item, and no doubt I’ll probably make more down the track. I’d like to experiment with using two contrasting fabrics and colours at some point.
This is great Rosie! I love the new ‘do – I shaved my head when I was 16, it is a liberating a challenging thing for a lady to do. I vote for the new vogue patterns next…
Thanks Taya! I’ve just had my hair ‘trimmed’, so it’s shorter than ever now!
I’ve also just finished my latest garment – Simplicity 1913. It’s making its debut at the office today – hopefully I’ll get a chance to post it this evening.
As per your request, I’ll escalate Vogue 1338 to next in line – just need to see if I have any suitable fabric in my stash. If not, the Fabric Store on Brunswick Street is having a sale this week… could be dangerous!