Warning: Trying to access array offset on value of type bool in /home4/offermag/public_html/vintagenotions/wp-content/themes/liquorice/header.php on line 28

Warning: Trying to access array offset on value of type bool in /home4/offermag/public_html/vintagenotions/wp-content/themes/liquorice/header.php on line 32

Warning: Trying to access array offset on value of type bool in /home4/offermag/public_html/vintagenotions/wp-content/themes/liquorice/header.php on line 36
RSS Feed

‘Pattern Alteration’ Category

  1. I’ve got the Blogging blues…

    October 8, 2013 by rosie

    I feel like this blog is doomed! Part of the problem is that in order to post, I feel I need to have created something new to share, but I have had so many setbacks lately, I just haven’t had the chance to sew anything!

    Last time I posted, I was all revved up about winter patterns and 1960’s-inspired pinafores and a bit of a fabric splurge on winter woolens at the Fabric Store’s sale. Unfortunately, sinus surgery put a big fat ugly spanner in the works – two weeks bedridden, in totally unglamorous recovery without even so much as cutting out a pattern let alone making something. Even knitting was too hard (I’m not a very committed knitter – I’ve been on and off knitting this for over a year now).

    However, whilst convalescing, even though I couldn’t physically do much, I did manage to do a lot of thinking about clothes and pattern construction and sewing and fabric. I opened up a few of my books for inspiration – including Claire B. Shaeffer’s Couture Sewing Techniques; the V&A’s The Golden Age of Couture: Paris and London 1947-1957 (that exhibition traveled to Bendigo back in the summer of 2008/09 – I went twice); and several of my Australian Home Journals. I love my AHJ’s, but the frustrating part is that, until the late 50’s/early 60-‘s, all the gorgeous free patterns are designed for ‘the average 36” bust figure’. I have come to the conclusion that this size is simply too big for me to try and adapt for my body type in a satisfactory way – the difference is just too much. As is my frustration. The only compromise I can see is to use the pattern pieces given as a guide to drafting a pattern from scratch in my bust size. However, there is one obvious impediment – I am not a trained pattern drafter.

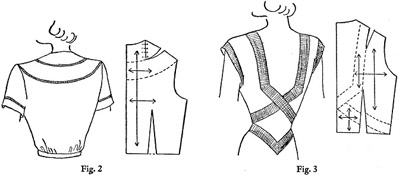
    In pondering this whilst bedridden, I rediscovered Harriet Pepin’s Modern Pattern Design – my husband had given me a copy of this book for my birthday a few years back. In a nutshell, this is a textbook, written in 1942, for pattern drafting. The images within it are delightful, and, obviously, all examples and illustrations and designs are beautiful, (and often complicated) vintage concoctions.


    draped skirt


    glamour skirt bodic backs

    The text itself, and its tone, is also a reminder of a bygone era. Harriett makes no concessions, and she certainly doesn’t beat around the bush when it comes to her (and her era’s ideas) of ‘good’ or ‘right’ design. Coming from today’s world, where we are encouraged to celebrate a diversity and range of body shapes, styles and opinions, Harriet’s world seems unforgiving:

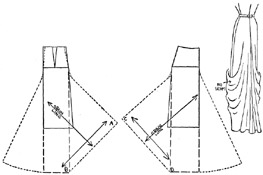
    “Notice that side seam lines E-F-H should change to conform to changing contours caused by flesh deposits on the heavier, mature figure. If side seam on Mrs. Heavy were to be made vertical as it was for Mrs. Slim, it would fail to divide her silhouette vertically and would reveal her bad figure lines.”

    If the following illustration is anything to go by, it’s amazing what 70 odd years can do to body shape perception. Consider Harriet’s examples below. In a country with one of the world’s highest and fastest growing obesity rate, is this how we would describe “Mrs Plump” ?

    Mrs Slim to Mrs Heavy

    Aside from the historical skew, I’ve been meaning to try out Harriet’s drafting technique for a while. It seems a little more involved than Winnifred Aldrich’s Metric Pattern Cutting, and as it’s ‘genuine vintage’, I guess I’m secretly hoping it will help me achieve a ‘genuine vintage’ look. Apart from the inconvenience of it all being in imperial measurements rather than metric, the one thing that has stopped me every time in the past is the apparent omission of any mention of ease in the bodice. Upon reading the chapter, it looks as though one is meant to take the literal body measurements and use them in the pattern draft without factoring in any ease at all. Surely that would make it impossible to get on the wearer, let alone make for a flattering and comfortable fit? Frustratingly, Harriet alludes to ease here and there in the chapter, but never explicitly states how much to add, or to which measurements. My first attempt at the bodice was pretty dismal – it’s evident I’m going to need a good chunk of time and space (and patience) to try and nut it out.

    Unfortunately, two weeks off work means a lot of catching up upon return, which, in turn, means no progress in the sewing front. The few things I have attempted lately have been disasters. It’s always so disappointing – you invest so much emotional hope and energy into the ‘vision’, and then there’s all the time spent cutting out the pattern, cutting out the fabric, sewing the pieces together, only to discover that, frankly, it looks terrible. The latest to this list was a shirt for my husband. In theory, it should have been fine – I’ve even used this pattern before on a shirt for him, with good results. But for some reason this time round, it’s just not working. It’s the cut of the shirt – it’s too daggy, too old man 1980’s baggy, and I’m not sure I can fix it. So bits of it are lying all over the house, mocking me. Do I spend the energy and try and finish it anyway and put it down to ‘experience’, or do I just move on? The worst of it is that I even used the ‘Classic Tailored Shirt’ tutorial from Craftsy. Don’t get me wrong, the tutorial is excellent, and Pam (the instructor) has such a relaxed and calming way of speaking and teaching. It’s just that, I was even more care careful than usual – trying to be precise in my pressing and turning and folding, and flat felling all the seams! So it’s a real shame that I’m just not convinced by the end product.

    And now that things have settled down a bit, the season is turning, and I’ve realised how fickle I am. We’ve had glimpses of sunshine, the days are getting longer, and daylight savings has just kicked in. All of a sudden I’m looking longingly at my summer cotton stash and thinking of 1950’s sundresses and Christmas party outfits and 50’s inspired shorts and shirts for the perfect picnic and bike ride scenario.

    Too bad we have to find a place to live and move house next month.


  2. Stash Slasher: Simplicity 1913 “Think Pink!”

    July 16, 2013 by rosie

    You know those projects that look innocently painless on paper, but end up being far more trouble than they should? Simplicity 1913 was one of those for me.

    pink dress2(3)

    For something as basic as a princess line bodice and straight skirt, this dress occupied a lot more time and energy than I anticipated. This was mainly due to the fabric I chose, and some silly oversights and lack of preparation by me.

    I had some lolly-pink wool in the stash that I’d been saving for ages – I had envisaged a straight 1960’s frock in it when I purchased the fabric. When I saw Simplicity1913, I thought it was a match made in heaven. I decided to do things ‘properly’ and so I splurged on some leopard print silk (it was on sale) for the lining – such a decadent choice for a lining! I was convinced this was going to be a glamour frock.

    I deviated from the pattern’s original construction instructions a little. As well as lining the skirt (which the pattern doesn’t call for – I can’t believe that!) I also interlined the back of the skirt with silk organza (I need to find out where I can get this stuff at a cheaper price). I decided to do this as I had been re-reading Gertie’s New Book For Better Sewing, and also another book on couture techniques, both of which extol the virtues of silk organza as a stabilizer. Given that this was a very loosely woven fabric, I felt the back of the skirt might sag, and could do with some extra reinforcement. I also reinforced the zipper with silk organza. I haven’t done either of these before, so I’ll be interested to see how the dress wears.

    This dress is designed to sit above the natural waistline (something I failed to notice until I had cut out the fabric). After making this dress, I don’t think I’m a fan of higher-than-usual waist lines for fitted things. If I made it again, I would be lengthening the waistline. As it is, I did a .5cm seam allowance on the join to try and add in a bit more length.

    In my haste to start the sewing, I COMPLETELY forgot to cut out the lengthened hemline (I always make the hems longer than the pattern does, due to most of my height coming from my legs). I am still berating myself for this – such a stupid mistake!!! I did the tiniest hem possible (bias binding), and I think it’s only just passable. Personally, I feel the dress looks silly this short. If you are on the tallish side, I highly recommend lengthening this dress.

    DSC_0235 (9)

    The other thing that totally didn’t work for me was the gathered waist in the skirt. Maybe it was the bulkier fabric choice, but this just looked terrible on me – far too much bulk and extremely unflattering. I improvised by putting two tucks in the front to get rid of the excess fabric, and by fashioning two darts in the back. I guess the result doesn’t look too bad.

    One thing that really  annoyed me about the pattern/construction was the collar. This is stitched onto the bodice after the lining has been attached. However, the instructions just tell you to leave the edges of the collar raw and exposed. I was shocked!!!! How ugly – and on the outside of the dress! Even though, in theory, this seam allowance is covered by the collar, I still feel that this is scandalous. Once I realised, I had to do something. I didn’t have any binding in an appropriate colour, and it was late at night, so I improvised by sewing this grosgrain ribbon (which was actually a decoration on a wrapped present I was given at Christmas) to neaten up the raw edges. This isn’t ideal – too bulky and springy to do neatly – but still, it’s better than nothing.

    I ended up not lining the sleeves – partly because I tend to get hot in the office during winter, and partly because I loved the lining fabric so much that I decided to make a matching neck bow to place at the collar with the remaining fabric.(Note, I was in such a hurry to wear the dress that I didn’t have time to stitch on the tie for the photos – I wore it to work all day with only two sewing pins holding it on! I think I will make it detachable by putting two little buttons underneath the collar to which the tie can attach).DSC_0243

    By the time I was ready to sew on buttons, I was fed up with the entire dress. I felt I had spent too much money on an outfit that didn’t come up to scratch, and which hadn’t fulfilled my vision – I wasn’t going to spend any more on it! All the buttons I loved were metallic and beyond the ‘budget’ for this dress ($2.50 per button adds up when you have to purchase 8 or so!). I went for some cheap and nasty plastic ones instead. The shop only had 6 left, so I had to be stingy with how many I could use (I had to be quite strategic and careful about where to space the buttons for the bust, to avoid unfortunate placings!). It turns out, these buttons annoy me in their plastic tackiness, so I’ll keep an eye out for some metallic ones in second hand shops and see if I can upgrade down the track.

    DSC_0240 (4)  DSC_0243


    The final change I made to the original pattern was the addition of a structured belt. Because of the dodgy .5cm seam allowance, the waistline isn’t sewn very neatly – it’s a bit uneven, and it needs hiding. It’s also still higher than I’d like, so a wide belt helps the ‘allusion’ of a longer bodice. It also helps to cinch in the waist a bit – I feel this dress isn’t very flattering, and has the opposite of a slimming effect (again, I think the bulky fabric is partly to blame).

    With the amount of re-picking and altering and silly mistakes,  I had to spend some time away from the dress in order to recompose myself and not end up completely hating it. Revisiting it now, and after a very positive debut at the office,  perhaps it isn’t too disastrous? I do love the pink and gold combination.  In fact, I feel like I could step into the  “Think Pink” scene from the timeless Audrey Hepburn classic ‘Funny Face’. And that can only be a good thing, so perhaps this dress will grow on me after all….


  3. Bound for Glory! (almost) – in pursuit of the perfect bound buttonhole.

    February 11, 2013 by rosie

    After what feels like an eternity and a thousand set-backs, I have finally completed my AHJ Frock No. 7641 from September 1, 1950. Yes, remember that dress I started ages ago, with the overly ambitious small bust adjustment? That SBA was stressful. But, it did end up working – sort of – with a lot of wrangling and ‘ad lib’.

    The reason I chose this dress in the first place was because I wanted to overcome my fear of bound buttonholes. With 13 of the suckers, I figured this dress was sure to put me on track.  Plus, I was also attracted to the ridiculously huge pockets.

    I consulted the Readers Digest in addition to Gertie’s new Book for Better sewing. The instructions and diagrams in this are great, and I highly recommend it. Warning though: Bound buttonholes are just as time consuming as you’d think!!!

    I must admit though, my bound buttonholes still aren’t as perfect as I hoped. I think they did improve as I went along. I did the window facing with silk organza for the facing as well – I had to do these entirely by hand for  the two buttonholes in the corner of the collar, as the angle was too acute for me to use the sewing machine by the time I had attached the facing to the collar. I suppose I shouldn’t aim or expect perfection for the my first time, and overall, I’m fairly happy with the dress.

    The fitting did cause some issues – I had to use 6 cm seam allowances rather than the normal 1.5, and I ended up fitting the front and back darts by ‘eye’ retrospectively (well, mum did the fitting when I went home to visit one weekend.) There’s one bit in the front (the bottom of the button hole facing bit) that doesn’t sit particularly well, and I’ll have to go back and hand sew it down a bit, but I think I can pull it off, overall.


    A bit crumpled from being at work all day, but you get the idea. The SBA didn't turn out too shabby after all!

    A bit crumpled from being at work all day, but you get the idea. The SBA didn’t turn out too shabby after all!

    The original pattern

    bound buttonholes are everywhere - collars, sleeves, opening and pockets!

    bound buttonholes are everywhere – collars, sleeves, opening and pockets!