Warning: Trying to access array offset on value of type bool in /home4/offermag/public_html/vintagenotions/wp-content/themes/liquorice/header.php on line 28

Warning: Trying to access array offset on value of type bool in /home4/offermag/public_html/vintagenotions/wp-content/themes/liquorice/header.php on line 32

Warning: Trying to access array offset on value of type bool in /home4/offermag/public_html/vintagenotions/wp-content/themes/liquorice/header.php on line 36
RSS Feed

‘Winter Outfits’ Category

  1. A Jaunty adventure with Tadah Patterns

    September 16, 2018 by rosie

    The ‘Jaunty’ Dress by Tahdah patterns

    Now that our little Miss is (scarily) hurtling towards being a 4 year old, she is becoming more and more vocal about what she wants to wear. At the moment, it’s all about having big twirly skirts, and tutus. She only has one of each, and they are on high rotation in the washing machine…they are the only things she’ll deign to wear. They often end up being worn to bed, and it’s then a full-on meltdown when I need to get them off her to wash them the next day.

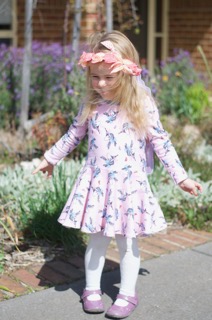
    Unicorns, horses and fairies and are all highly coveted, particularly if they are pink, pink, pink! So when I found this French Terry in Spotlight a few months ago, I knew it would be a hit.

    This was my first time using French Terry – I don’t think I’ve ever even seen it in Spotlight before. It’s nice and fuzzy/fleecy on the inside, so it feels soft and cosy, and while it’s cotton, I think it had a little elastane (maybe 5%) so it was comfy and stretchy too.

    I’m actually not a big unicorn fan, so I can’t say I love this print, but the design on the only other French Terry on offer was really quite weird, so it was the only viable option. The musky pink background combined with the unicorns is quite overly saccharine, but at least it doesn’t have sparkles and glitter all over it. And, in the eyes of my almost-4yo, it’s gorgeous.

    Fairy wings and head garland entirely optional

    This pattern is from an Australian indie company, Tadah patterns, that I’ve only just discovered. Evidently, I’m very late to the party, as I realised when I joined their facebook group (TahDah Pattern Party). Thousands of people have used these patterns, and there are some gorgeous and inspiring versions of the designs that people have posted. It’s made me all enthusiastic, and now I have dozens more projects added to my mental to do list. It’s amazing how much time can be spent scrolling through the Facebook feed ooh-ing and ah-ing over all the beautiful dresses people have made! It also has made me purchase quite a lot of the patterns. But that’s OK – as I pointed out to my husband, I love that I’m supporting an Australian business.

    I’ve only recently discovered the whole indie pattern thing. I’m not sure how I stumbled onto Tadah Patterns, but I’m so glad I did. I’ve been listening to the British podcast, “Stitchers Brew”, which I’ve been thoroughly enjoying, and it’s made me realise that the whole indie pattern thing is an entire world in itself.

    First, you don’t have to drive to a shop to get a pattern! Or wait days on end for the post to arrive if you order a physical one from one of the big 4’s online. Secondly, you can literally buy an indie pattern online, and BAM! the PDF is in your inbox instantly, ready for you to print off and get sewing. Yes, you have to print off a lot of different pages and tape them together, but honestly, its not as bad or as time consuming as I expected.

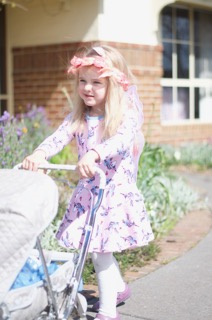
    The perfect dress to wear when taking dolly for a walk.

    So, this is the “Jaunty Dress” by Tadah patterns. The instructions are super clear and thorough, and the whole dress is very quick to make. I read through the instructions to begin with and then pretty much went ahead and made it without referring to them again. It does recommend using an overlocker for all the seams – I decided to give this a go, and on the whole, it wasn’t as traumatic as I was expecting. The seam allowances are very overlocker-friendly at 6mm, so that helps. And I learnt a new trick – the “overlocker flip method”, which helps give a nice clean and secure finish at the end of the sleeves, something I’ve struggled with in the past. Another revelation was using a rotary cutter instead of scissors to cut out the fabric! Brilliant!

    I must admit, this isn’t my best handiwork. I botched one of the seams –the bodice and skirt side seam don’t quite match up, but because it was all overlocked, I wasn’t about to unpick it!. I also managed to make a complete mess of the twin needle topstitching around the neckband. I have NEVER managed to do a good job on this, but this one was so bad, I ended up unpicking it all and calling it quits. If you look closely, you can see where the stitches were, but luckily this is of no concern for its wearer!

    In conclusion, this pattern is great – the full circle dropped waist skirt is comfy and flattering over little tadpole tummies, and affords full twirling capacity for all the ballet/fairy/princess moves. It’s comfy and easy to wear, and comes with quite a few sleeve variations (so I’ll be making some more for the warmer weather – if it ever gets here!). The final garment was, thankfully, met with approval by its fussy recipient; after wearing it all day, she insisted on wearing it to bed as well.

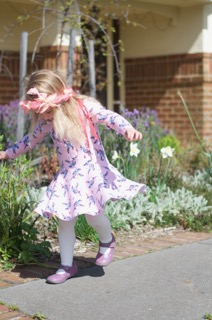
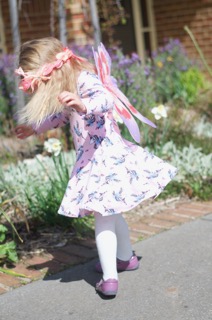
    The circle skirt enables full twirlage

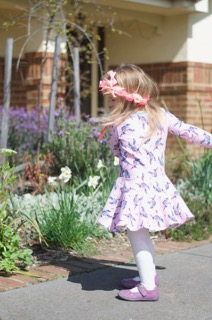
    Did I mention it’s good for twirling?

    This is a size 4 – I made no adjustments to the pattern aside from doing a slightly smaller hem on the sleeves in order to make them a little longer. I probably should have made a 5 so that it would fit next year too, but I didn’t think of that until after it was all cut out. I suspect there will be many more Jaunty dresses in my life for the next few years!

    A very happy customer!


  2. A not so Kwik Sew K3977

    August 24, 2018 by rosie

    Let’s ignore the fact that I haven’t posted anything on here for, well, ages.
    I am attributing this to a whole range of reasons – including increased working hours, juggling a three-and-half year old, a ridiculous amount of sickness this year, and also a bit of an identity crisis triggered mainly by the devastating realisation that I need to wear orthotics, and, consequently, chunky sensible shoes. This has severely impacted what style of clothing I can wear and, consequently, my sewjo.

    Anyway, moving on.

    Behold Kwik Sew 3977. I haven’t used Kwik Sew much before. The styling and cover art of this is a bit dated – I’m always a bit behind the times, catching up on fashion trends just as they are fading away.

    Knowing that there was the distinct possibility that this could turn into a frumpy mess, I thought I’d give it a go regardless. I wanted a long-line, easy, comfy and casual jacket I could just throw on over jeans etc.

    Of course, I had nothing appropriate in my stash of fabric, but a trip to The Fabric Store in Brunswick Street solved that problem. The fabric suggestion on the pattern envelope is a bit confusing – it says it is designed for heavyweight stretch fabrics, and then it suggests fleece or boiled wool. I didn’t realise that boiled wool was considered a stretch fabric?

    Anyway I found a double-sided wool/cotton that was quite thick and also had a bit of stretch to it. One side is a plain reddish colour, the other a checked blue and red. I thought given that both sides would be visible in the design, having the contrast would work well.

    I checked out Pattern Review, to suss out how other people found this pattern. I was thankful for the recommendation somebody suggested to increase the seam allowance on the centre back neck, so that the edges could be finished properly, as this seam may be visible, depending on whether the collar sits up or down. The original pattern only allows for a 6mm seam allowance – I think it assumes people will overlock all the seams, negating the need for much allowance. That kind of freaked me out a bit – I’m just not used to working with such tiny allowances.

    Anyway, I did make the seam allowance on the neck larger (the normal 1.5cm), and I ended up finishing this by tucking under the allowances and stitching down through all thicknesses so that both sides of the collar had a neat appearance.

    As for adjustments, I graded out across several sizes to accommodate my small bust and wider hips; I also lengthened the sleeves a bit, and thank goodness I did! They only just ended up long enough.

    This should have been a really simple, speedy sew, but it ended up taking much longer than expected, due to the fact that:

    1) It took me ages to cut out the pieces, because I was trying to pattern match the checks, as well as waste the least possible amount of fabric. Turns out I didn’t do a particularly good job of this, and I had to fudge the side seams a bit to get the horizontal stripes to match all the way down.

    laying out the pattern pieces and trying to match the stripes

    2) I hated how messy the inside was at the seam that joined the shoulders and collar ( stitched all in on). So I ended up cutting a strip of the same fabric and hand sewing this down on top to create a sort of binding. That took much longer than expected. It also ended up being a bit bulky by the time the edges were folded under, but I think it’s ok. It’s a bit wonky, but at the very least, it’s an improvement to the original seam!

    The finished seam of the collar contrasted with gross seam of the neckline (with a whole heap of tailors tacks still there!). I ended up stitching a bias strip over the neckline seam to neaten up – but forgot to take a photo of the end result!

    3) I couldn’t deal with the suggestion to leave all the edges unfinished (un-hemmed). So I decided to bind the sleeve and all the way around the edge of the jacket. I made a trip to a posh expensive store in the city on the quest for woollen binding to use. The lady offered to help me, and suggested a red binding. It wasn’t QUITE the same red, but I thought, “well, if she thinks it’s ok, it must be”. She then offered to help me measure the jacket to figure out how much of the binding I needed. As I was watching her, I was thinking to myself “I don’t think her measuring or her math is right”. But then I thought, “well, she’s the expert, not me”.

    Of course, when I get home that night, I find I have nowhere near enough binding. And it became evident under my lighting that the choice of red was completely off.

    Frustrated with the lady and annoyed that I didn’t trust my own judgement, I refused to go back to the store or spend any more money on the project. By this time, I was pretty over the whole thing anyway.

    So I found an old remnant of navy wool crepe in my stash and cut out my own bias binding. I had to join it together in quite a few places, as it was a rather small piece of fabric.
    I then decided to hand stitch it all down to finish the binding – I feared that I couldn’t top stitch that accurately through such thickness on a sewing machine. Again, this was quite time consuming – from memory, at least 2 episodes of Mindhunter on Netflix.

    Hand basting the binding in place before hand-stitching it permanently down.

    The final product – see how low that pocket opening is?

    I couldn’t be bothered putting in two pockets, so I just did one, made from some navy cotton drill I had left over from a previous project. To me, I feel that the pocket placement is slightly too low – it almost hangs down further than the hem of the jacket, and the pocket opening seems a bit too far down the body to feel natural.

    A pocket!

    All in all, I’m reasonably happy with the end result. It doesn’t look too bad, and it’s surprisingly warm. Turns out though, I’ve hardly got anything that goes with it!! I think I’ll have to make a few plain separates next, so that I can actually wear the jacket!

    The back – I did end up getting those strips to match, with a bit of wrangling.


  3. Australian Home Journal 9044

    May 16, 2017 by rosie

    dsc_0414

    One of the problems with having small children is that they grow so quickly. In terms of sewing, this is a problem because:

    a) I finally get around to sewing her something, and then she hardly gets a chance to wear it because she grows out of it.

    b) She grows so quickly and I have minimal sewing time, so by the time I consult my (somewhat extensive) toddler sewing pattern stash, I realise with horror that half the patterns I’ve been thinking about and dying to make are no longer applicable, because they are too small. I can’t help but mourn for the patterns I may never have the chance to realise.

    So, when my little vintage Australian Home Journal coat pattern arrived in the mail, I decided that I should just go for it and make it ASAP, in order to maximise wear before winter set in. I had a feeling it would be a little on the too big side, but I figured that this was a far better outcome to have than too small – maybe she’ll even get to wear it next winter too!

    It was, of course, exactly around this time that my beloved Bernina started playing up, and I had to take it in to be serviced. SIX WEEKS LATER I was finally able to get stuck into the coat.

    This is definitely a stash slasher. The wool is left over from a project I made about five years ago; the lining was a piece of silk that had been wallowing in a tub for a couple of seasons. Even the inter-lining was a piece of Shapewell I found in mum’s sewing cupboard when I was up visiting at Easter time (thanks mum!).

    As for the pattern itself, I’m guessing it’s from around the 50’s, but that’s really a stab in the dark. I don’t think it had ever been used- it seemed to be still factory folded and I couldn’t see any signs of wear and tear or pin marks etc. I always get a little thrill when I discover an old pattern and I am able to give it another chance at becoming a real garment. Maybe the original pattern purchaser had my problem, and by the time she got around to making this coat, her child was too big for it!

    img_1520
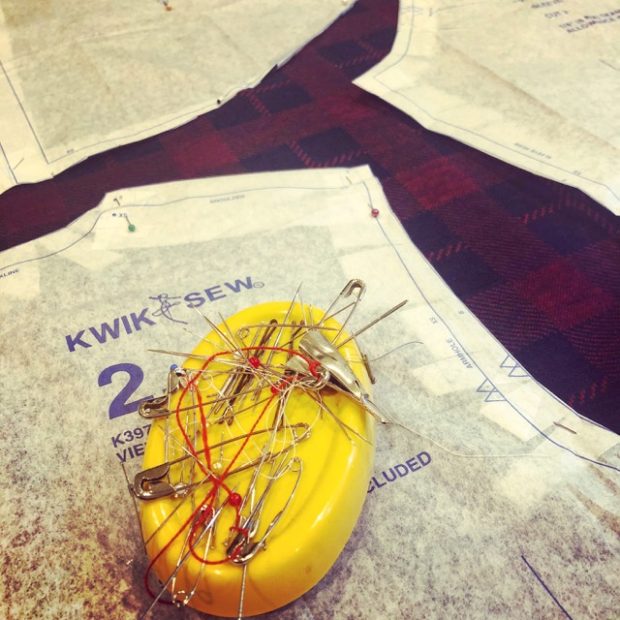
Anyway, typical of the era, there were no markings on the pattern, just a couple of punch holes that you have to decipher to tell you where the grain of the fabric is etc. And no separate pattern pieces for linings – just a brief sentence or two about how to alter the existing patterns and the assumption that the reader will figure it out.

    Similarly, the instructions are crammed onto two pieces of paper (the other sides are advertisements for buttons), with tiny hand-drawn illustrations that aren’t always completely accurate. Each ‘step’ actually contains about 4 or 5 steps in one that are sometimes only partially explained, and again, sometimes just assumed knowledge.

    The other challenge was that the front envelope illustration wasn’t a completely accurate depiction of the coat – particularly the collar, which doesn’t meet at centre, as implied in the drawing.

    I confess I did a bit of googling to brush up on bound buttonholes – the ‘instructions’ supplied just didn’t cut it for me! Plus, they used a different method to what I had used previously and I wasn’t confident it would work with such bulky fabric. In the end, the method I went with turned out pretty well in the end and were not as traumatic as I was expecting them to be.

    img_1615

    img_1617
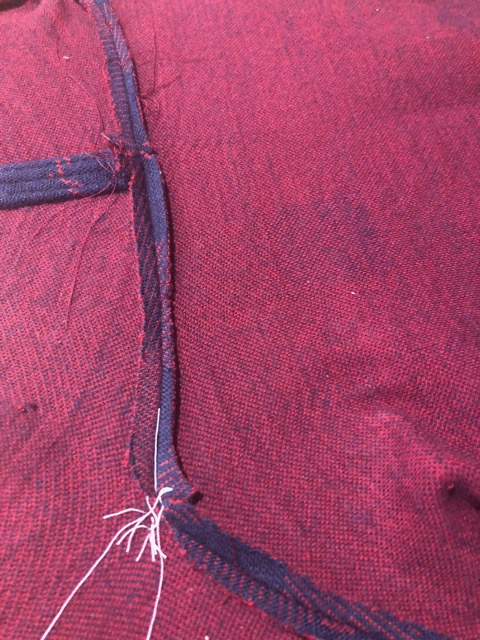
Sewing the points of the yoke was a little tricky – trickier than I was anticipating. The finished result isn’t perfect, but luckily, working with such a bulky fabric means that it’s quite forgiving. Still, every time I look at it I wish I had done a better job!

    dsc_0401

    I don’t think I’ve ever done welt pockets before, so this was a new thing for me too. They are not perfectly even which annoys me slightly but I’m glad I gave them a go – it was tempting to just sew right down that seam and omit them altogether!

    dsc_0412
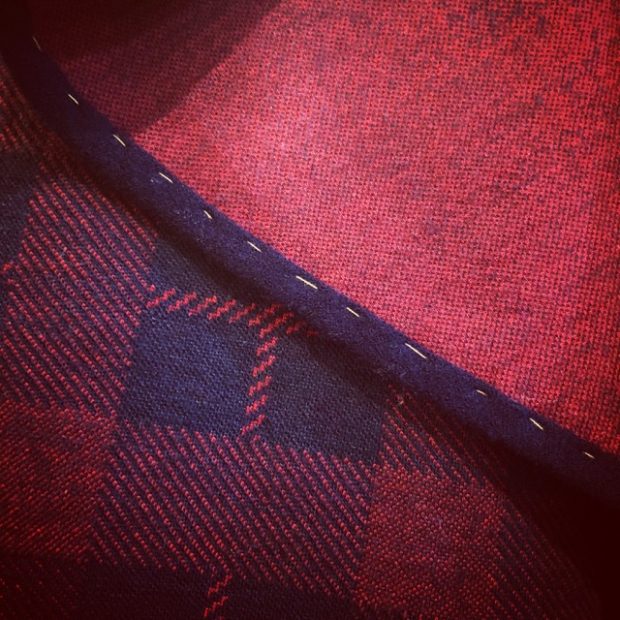
The lining is attached by hand to the jacket. I suppose being a child’s jacket, this task didn’t seem too onerous – not sure how I’d feel about doing this in an adult size though!

    I’ve always loved little girls’ jackets, especially with a vintage vibe. I’m glad I had the courage to give this one a go, even if the end result is far from flawless. And yes, it is too big (especially in the sleeves), which I might address at some point if I have the time.

    dsc_0417I should have given it a bit of a press before taking these photos – it had been sitting on the back seat of our car up when I popped it on her and it’s a little crumpled.

    dsc_0408

    Winter is well and truly on its way here in Victoria, so I’m glad I got it done in time. Problem is, its little headstrong owner is refusing to wear any type of jacket (or cardigan or jumper or poncho) at the moment! Maybe next year…


  4. Simplicity 1717

    June 23, 2014 by rosie

    skirt_june2014-4

    Wow. it’s been about 6 months since I posted anything. Where did those months go?! How can it be June – and almost July – already?!

    Needless to say, 2014 hasn’t really been the year of amazing, endless sewing productivity and inspiration. In fact, it could be fair to say that I completely lost my sewing mojo. My zeal for that, and anything else I usually enjoy, just seemed to disappear altogether. Just thinking about getting out fabric or pulling out the sewing machine made me feel overwhelmed.

    Not that the year has been completely sewing-less. I did make this dress back in February, and didn’t get around to blogging it:

    DSC_0050 (Medium) DSC_0047 (Medium)

    And then, there was the 6 meter ‘golden curtain’ I had to make in two days for work for a function. That was an interesting experience – I got to legitimately ‘work from home’…swapping my PC for my sewing machine in the name of ‘other duties as required’! It required metres and metres of fabric (over 14 metres of disgusting synthetic shiny stuff we found in the back of the work storeroom from a function years ago) – sewing in putrid hot summer heat. It was almost as long as my single-fronted house; working with such a large amount of fabric was a bit tricky to wrangle. I used fishing hooks in the bottom to weight the curtain down and I just used curtain gathering tape at the top, with some black ties to tie it on to a rigging beam.

    The end result:

    golden curtain

    Then there was the 14 metres of purple-themed bunting for my best friend’s Hens day. I had a very tight timeframe, so my sister came over with her sewing machine, and we set up a production line in my living room, cutting and zooming through triangles, and listening to songs on the radio from the 1980’s. Here’s a sample of just some of it:

    DSC_0074 (Medium) DSC_0077 (Medium)

    And then I became an Aunty for the first time, (Yay!!!)  so I knitted a little cardigan to welcome Walter into the world. 7 weeks later, he’s already well and truly grown out of it!

    walter-1 walter-2

    But apart from these things – which I consider more craft than sewing – I’ve really had to force myself to get back into anything, including my sewing room. My first sewing attempt was waaaay too ambitious, and ended up being a complete and utter disaster – both financially and for my self worth! I’m not yet ready to talk about that one. Let’s just say I don’t think it’s salvageable and for the time being it’s screwed up in a ball out of sight.

    In order to ease my way back into the sewing world, I decided to be kind to myself and attempt something decidedly more achievable. Something that would be quick, straightforward and with minimal fitting or construction issues. The resulting project? – Simplicity 1717.

    skirt_june2014-6You might remember my fabric shopping spree last year. Among my purchases was a remnant of green, brown and cream check wool. Not my usual colours, but it was on sale and the green was sort of cheery.

    With winter well and truly at home in Melbourne, it was time to bring down by boxes of winter fabric. This piece seemed to fit the bill – there was just enough for the skirt, and it is so thick, it’s basically like wearing a warm woolen blanket.

    skirt_june2014-5

    It’s funny, I haven’t really worked that much with fabrics where you have to align a pattern, like a check. It was evident too. It took me AGES to lay the pieces out in a way which I thought would cause the least interruption to the check pattern. The centre seam was a bit of an issue, as this isn’t cut on the straight of the grain, so I knew that no matter what, the lines were going to look bit skewiff. However, even despite my painstaking attempts at lining things up perfectly, I realised AFTER I had cut out the pieces that I should have laid it out on the perpendicular grain, as the squares were evenly spaced that way and not that way I had cut it out. DANG!!!!!!

    skirt_june2014-3

    I decided to embrace the busy-ness of the check pattern and go with the massive over-sized pockets (who doesn’t love a pocket?!). And, in order to maximise the busy-ness, I decided to cut these on the bias, to add contrast and to detract the eye away from the (sort of mis-aligned) background check.

    I’m so glad I did! I love the pockets!

    skirt_june2014-2


    I made a few changes to this pattern, as follows:

    • I cut the pockets on a bias
    • I added a lining
    • I used lining fabric for the waistband facing, as the wool was just far too bulky
    • I didn’t hem the top of the pockets as described (again due to the thickness). Instead I just finished it off with a bias binding. (Unfortunately, I only had some lilac colour on hand, so it doesn’t exactly go)
    • lengthened the skirt a bit.

    I probably should have faced the pockets with some calico or something, to avoid it stretching. Whoops – I didn’t think of that until I was finished.

    After sewing and wearing so many retro style garments in recent years, it felt really strange to wear something that was slung lower down on my hips. Comfortable, yes, but odd. Too be honest, it’s probably a little lose. And because of the thickness of the fabric, the bulk at the seams, especially where the skirt attaches to the facing, means that it’s a bit bulky, and, kind of unflattering. It makes me look fatter than I am.

    But, it’s super comfy, it’s cheery and really warm!

    All in all, an easy pattern that didn’t have too many nasty surprises. A good project to ease back into the sewing world.


  5. Vogue 1338 and gourmet tracksuit fabric: flirting with the 1980’s

    July 27, 2013 by rosie

    Red Dress 001Illness has slowed me down in my turbo sewing frenzy, but I have managed to complete another project.

    A somewhat dangerous trip to The Fabric Store on Brunswick Street resulted in purchasing of more fabric (so much for stash reduction).  They were having a sale (it’s still on, with even more reductions now!), and so my husband wisely felt that I would require his supervision. He was right, and luckily he was able to balance my euphoria and enthusiasm with a more rational approach of forcing me to justify the potential purchase for each piece of fabric fondled.

    So much temptation!

    I ended up with a few really nice pieces of fabric. A great pink and grey houndstooth wool which I think might end up as Simplicity 2154 , some awesome silk to use as lining which picks up these colours, a remnant piece of tweedy wool (not sure what I’ll make from this yet) and a few other pieces as well.

    My Fabric purchases

    But I also purchased some  dark red pure wool fleece. It was so soft and cuddly and cozy, I just had to get it. It has a very slight stretch to it, and the lady at the store felt that it would work for Vogue 1338, even though it’s not as stretchy  and is much thicker than the fabric suggested on the pattern cover. By the time I got home, I realised that I was at risk of serious 1980’s channeling – batwing sleeves, wide belt and – shcok horror – an elasticized waist! And to top it all off –I was about to make it out of what is essentially very gourmet tracksuit fabric!!!!! Was this all a very big mistake?  All I would need to complete this 1980’shorror vision would be some geometric earrings and lashings of turquoise eyeshadow…

    Nevertheless, the allure of a comfy, fuzzy, cosy dress was too much. I haven’t really sewn with many knits or stretch fabrics, and I confess that I have a bit of a fear of them. But I’m so glad that I went ahead – I’m really happy with the result.

    reddressmontage

    These photos were taken early in the morning after I had debuted the dress at the office. Consequently the dress is a bit crumpled – I really should have given it a pressing. And apologies for the low-res images.

    The pattern packet says ‘easy’, and it really is! The hardest part was laying out the pattern pieces on the fabric  for cutting out– the front bodice piece is really wide, so trying to get all the pieces to fit on with the right grain/stretch direction is a challenge. You really do need to have wide fabric to get it out.

    I love the fact that the design means that there isn’t really any fitting requirements for the bodice- it’s loose and baggy, and there aren’t even any sleeves to set in – Brilliant! I will say though, that with all the folds in the front bodice, you do  have to sew through lots of layers of fabrics – probably about 6 at some points. With my thick fabric choice, this was the equivalent of an off-road 4WD adventure, but my trusty Bernina handled it well.

    As usual, there were a few modifications:

    • The usual tapering of sizes in the side seams,

    • adding 5cm to the skirt length (thank goodness I did!)

    • Omitting the elasticized arms. This was because my chosen fabric was simply too thick to cope with the gathering caused by elastic. These arms are VERY tight – there wasn’t enough give in the arms or the fabric for further bunching up. I simply hacked off the length where I wanted it, and hemmed the bottom.

    • I didn’t have any clear elastic on hand, so I just got a thick piece of white elastic and cut it to fit my waist. I centered it over the bodice/skirt seam allowances, and stitched it down on each side. Believe it or not, I’ve never sewn with elastic before, and I did a bit of a messy job – it looks fine on the outside, but there’s a reason I’m not showing you any photos of the inside!

    I have to say, this dress is very comfortable to wear, and I was warm and snuggly in it all day. And I felt very smug with my little secret that I was, essentially, wearing tracksuit dress to work!


  6. Stash Slasher: Simplicity 1913 “Think Pink!”

    July 16, 2013 by rosie

    You know those projects that look innocently painless on paper, but end up being far more trouble than they should? Simplicity 1913 was one of those for me.

    pink dress2(3)

    For something as basic as a princess line bodice and straight skirt, this dress occupied a lot more time and energy than I anticipated. This was mainly due to the fabric I chose, and some silly oversights and lack of preparation by me.

    I had some lolly-pink wool in the stash that I’d been saving for ages – I had envisaged a straight 1960’s frock in it when I purchased the fabric. When I saw Simplicity1913, I thought it was a match made in heaven. I decided to do things ‘properly’ and so I splurged on some leopard print silk (it was on sale) for the lining – such a decadent choice for a lining! I was convinced this was going to be a glamour frock.

    I deviated from the pattern’s original construction instructions a little. As well as lining the skirt (which the pattern doesn’t call for – I can’t believe that!) I also interlined the back of the skirt with silk organza (I need to find out where I can get this stuff at a cheaper price). I decided to do this as I had been re-reading Gertie’s New Book For Better Sewing, and also another book on couture techniques, both of which extol the virtues of silk organza as a stabilizer. Given that this was a very loosely woven fabric, I felt the back of the skirt might sag, and could do with some extra reinforcement. I also reinforced the zipper with silk organza. I haven’t done either of these before, so I’ll be interested to see how the dress wears.

    This dress is designed to sit above the natural waistline (something I failed to notice until I had cut out the fabric). After making this dress, I don’t think I’m a fan of higher-than-usual waist lines for fitted things. If I made it again, I would be lengthening the waistline. As it is, I did a .5cm seam allowance on the join to try and add in a bit more length.

    In my haste to start the sewing, I COMPLETELY forgot to cut out the lengthened hemline (I always make the hems longer than the pattern does, due to most of my height coming from my legs). I am still berating myself for this – such a stupid mistake!!! I did the tiniest hem possible (bias binding), and I think it’s only just passable. Personally, I feel the dress looks silly this short. If you are on the tallish side, I highly recommend lengthening this dress.

    DSC_0235 (9)

    The other thing that totally didn’t work for me was the gathered waist in the skirt. Maybe it was the bulkier fabric choice, but this just looked terrible on me – far too much bulk and extremely unflattering. I improvised by putting two tucks in the front to get rid of the excess fabric, and by fashioning two darts in the back. I guess the result doesn’t look too bad.

    One thing that really  annoyed me about the pattern/construction was the collar. This is stitched onto the bodice after the lining has been attached. However, the instructions just tell you to leave the edges of the collar raw and exposed. I was shocked!!!! How ugly – and on the outside of the dress! Even though, in theory, this seam allowance is covered by the collar, I still feel that this is scandalous. Once I realised, I had to do something. I didn’t have any binding in an appropriate colour, and it was late at night, so I improvised by sewing this grosgrain ribbon (which was actually a decoration on a wrapped present I was given at Christmas) to neaten up the raw edges. This isn’t ideal – too bulky and springy to do neatly – but still, it’s better than nothing.

    I ended up not lining the sleeves – partly because I tend to get hot in the office during winter, and partly because I loved the lining fabric so much that I decided to make a matching neck bow to place at the collar with the remaining fabric.(Note, I was in such a hurry to wear the dress that I didn’t have time to stitch on the tie for the photos – I wore it to work all day with only two sewing pins holding it on! I think I will make it detachable by putting two little buttons underneath the collar to which the tie can attach).DSC_0243

    By the time I was ready to sew on buttons, I was fed up with the entire dress. I felt I had spent too much money on an outfit that didn’t come up to scratch, and which hadn’t fulfilled my vision – I wasn’t going to spend any more on it! All the buttons I loved were metallic and beyond the ‘budget’ for this dress ($2.50 per button adds up when you have to purchase 8 or so!). I went for some cheap and nasty plastic ones instead. The shop only had 6 left, so I had to be stingy with how many I could use (I had to be quite strategic and careful about where to space the buttons for the bust, to avoid unfortunate placings!). It turns out, these buttons annoy me in their plastic tackiness, so I’ll keep an eye out for some metallic ones in second hand shops and see if I can upgrade down the track.

    DSC_0240 (4)  DSC_0243


    The final change I made to the original pattern was the addition of a structured belt. Because of the dodgy .5cm seam allowance, the waistline isn’t sewn very neatly – it’s a bit uneven, and it needs hiding. It’s also still higher than I’d like, so a wide belt helps the ‘allusion’ of a longer bodice. It also helps to cinch in the waist a bit – I feel this dress isn’t very flattering, and has the opposite of a slimming effect (again, I think the bulky fabric is partly to blame).

    With the amount of re-picking and altering and silly mistakes,  I had to spend some time away from the dress in order to recompose myself and not end up completely hating it. Revisiting it now, and after a very positive debut at the office,  perhaps it isn’t too disastrous? I do love the pink and gold combination.  In fact, I feel like I could step into the  “Think Pink” scene from the timeless Audrey Hepburn classic ‘Funny Face’. And that can only be a good thing, so perhaps this dress will grow on me after all….