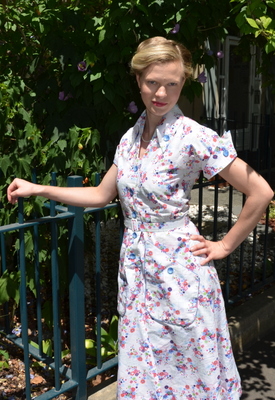
You know those projects that look innocently painless on paper, but end up being far more trouble than they should? Simplicity 1913 was one of those for me.

For something as basic as a princess line bodice and straight skirt, this dress occupied a lot more time and energy than I anticipated. This was mainly due to the fabric I chose, and some silly oversights and lack of preparation by me.
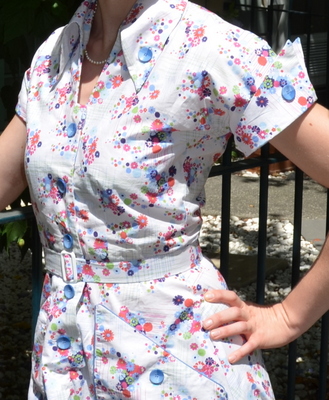
I had some lolly-pink wool in the stash that I’d been saving for ages – I had envisaged a straight 1960’s frock in it when I purchased the fabric. When I saw Simplicity1913, I thought it was a match made in heaven. I decided to do things ‘properly’ and so I splurged on some leopard print silk (it was on sale) for the lining – such a decadent choice for a lining! I was convinced this was going to be a glamour frock.
I deviated from the pattern’s original construction instructions a little. As well as lining the skirt (which the pattern doesn’t call for – I can’t believe that!) I also interlined the back of the skirt with silk organza (I need to find out where I can get this stuff at a cheaper price). I decided to do this as I had been re-reading Gertie’s New Book For Better Sewing, and also another book on couture techniques, both of which extol the virtues of silk organza as a stabilizer. Given that this was a very loosely woven fabric, I felt the back of the skirt might sag, and could do with some extra reinforcement. I also reinforced the zipper with silk organza. I haven’t done either of these before, so I’ll be interested to see how the dress wears.
This dress is designed to sit above the natural waistline (something I failed to notice until I had cut out the fabric). After making this dress, I don’t think I’m a fan of higher-than-usual waist lines for fitted things. If I made it again, I would be lengthening the waistline. As it is, I did a .5cm seam allowance on the join to try and add in a bit more length.
In my haste to start the sewing, I COMPLETELY forgot to cut out the lengthened hemline (I always make the hems longer than the pattern does, due to most of my height coming from my legs). I am still berating myself for this – such a stupid mistake!!! I did the tiniest hem possible (bias binding), and I think it’s only just passable. Personally, I feel the dress looks silly this short. If you are on the tallish side, I highly recommend lengthening this dress.

The other thing that totally didn’t work for me was the gathered waist in the skirt. Maybe it was the bulkier fabric choice, but this just looked terrible on me – far too much bulk and extremely unflattering. I improvised by putting two tucks in the front to get rid of the excess fabric, and by fashioning two darts in the back. I guess the result doesn’t look too bad.
One thing that really annoyed me about the pattern/construction was the collar. This is stitched onto the bodice after the lining has been attached. However, the instructions just tell you to leave the edges of the collar raw and exposed. I was shocked!!!! How ugly – and on the outside of the dress! Even though, in theory, this seam allowance is covered by the collar, I still feel that this is scandalous. Once I realised, I had to do something. I didn’t have any binding in an appropriate colour, and it was late at night, so I improvised by sewing this grosgrain ribbon (which was actually a decoration on a wrapped present I was given at Christmas) to neaten up the raw edges. This isn’t ideal – too bulky and springy to do neatly – but still, it’s better than nothing.
I ended up not lining the sleeves – partly because I tend to get hot in the office during winter, and partly because I loved the lining fabric so much that I decided to make a matching neck bow to place at the collar with the remaining fabric.(Note, I was in such a hurry to wear the dress that I didn’t have time to stitch on the tie for the photos – I wore it to work all day with only two sewing pins holding it on! I think I will make it detachable by putting two little buttons underneath the collar to which the tie can attach).
By the time I was ready to sew on buttons, I was fed up with the entire dress. I felt I had spent too much money on an outfit that didn’t come up to scratch, and which hadn’t fulfilled my vision – I wasn’t going to spend any more on it! All the buttons I loved were metallic and beyond the ‘budget’ for this dress ($2.50 per button adds up when you have to purchase 8 or so!). I went for some cheap and nasty plastic ones instead. The shop only had 6 left, so I had to be stingy with how many I could use (I had to be quite strategic and careful about where to space the buttons for the bust, to avoid unfortunate placings!). It turns out, these buttons annoy me in their plastic tackiness, so I’ll keep an eye out for some metallic ones in second hand shops and see if I can upgrade down the track.


The final change I made to the original pattern was the addition of a structured belt. Because of the dodgy .5cm seam allowance, the waistline isn’t sewn very neatly – it’s a bit uneven, and it needs hiding. It’s also still higher than I’d like, so a wide belt helps the ‘allusion’ of a longer bodice. It also helps to cinch in the waist a bit – I feel this dress isn’t very flattering, and has the opposite of a slimming effect (again, I think the bulky fabric is partly to blame).
With the amount of re-picking and altering and silly mistakes, I had to spend some time away from the dress in order to recompose myself and not end up completely hating it. Revisiting it now, and after a very positive debut at the office, perhaps it isn’t too disastrous? I do love the pink and gold combination. In fact, I feel like I could step into the “Think Pink” scene from the timeless Audrey Hepburn classic ‘Funny Face’. And that can only be a good thing, so perhaps this dress will grow on me after all….

Warning: Trying to access array offset on value of type bool in /home4/offermag/public_html/vintagenotions/wp-content/themes/liquorice/header.php on line 28
Warning: Trying to access array offset on value of type bool in /home4/offermag/public_html/vintagenotions/wp-content/themes/liquorice/header.php on line 32
Warning: Trying to access array offset on value of type bool in /home4/offermag/public_html/vintagenotions/wp-content/themes/liquorice/header.php on line 36
RSS Feed