Warning: Trying to access array offset on value of type bool in /home4/offermag/public_html/vintagenotions/wp-content/themes/liquorice/header.php on line 28

Warning: Trying to access array offset on value of type bool in /home4/offermag/public_html/vintagenotions/wp-content/themes/liquorice/header.php on line 32

Warning: Trying to access array offset on value of type bool in /home4/offermag/public_html/vintagenotions/wp-content/themes/liquorice/header.php on line 36
RSS Feed

‘Finished Project’ Category

  1. A not so Kwik Sew K3977

    August 24, 2018 by rosie

    Let’s ignore the fact that I haven’t posted anything on here for, well, ages.
    I am attributing this to a whole range of reasons – including increased working hours, juggling a three-and-half year old, a ridiculous amount of sickness this year, and also a bit of an identity crisis triggered mainly by the devastating realisation that I need to wear orthotics, and, consequently, chunky sensible shoes. This has severely impacted what style of clothing I can wear and, consequently, my sewjo.

    Anyway, moving on.

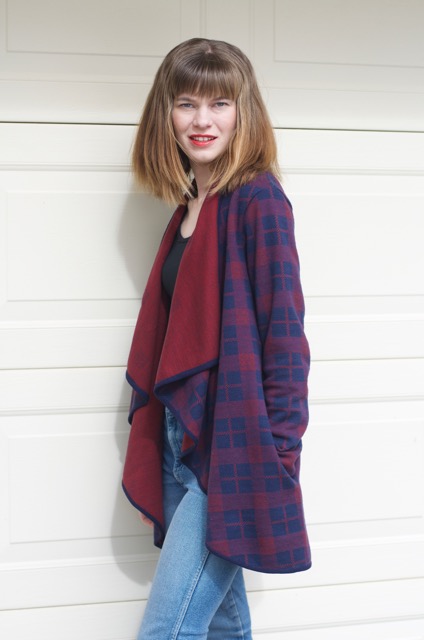
    Behold Kwik Sew 3977. I haven’t used Kwik Sew much before. The styling and cover art of this is a bit dated – I’m always a bit behind the times, catching up on fashion trends just as they are fading away.

    Knowing that there was the distinct possibility that this could turn into a frumpy mess, I thought I’d give it a go regardless. I wanted a long-line, easy, comfy and casual jacket I could just throw on over jeans etc.

    Of course, I had nothing appropriate in my stash of fabric, but a trip to The Fabric Store in Brunswick Street solved that problem. The fabric suggestion on the pattern envelope is a bit confusing – it says it is designed for heavyweight stretch fabrics, and then it suggests fleece or boiled wool. I didn’t realise that boiled wool was considered a stretch fabric?

    Anyway I found a double-sided wool/cotton that was quite thick and also had a bit of stretch to it. One side is a plain reddish colour, the other a checked blue and red. I thought given that both sides would be visible in the design, having the contrast would work well.

    I checked out Pattern Review, to suss out how other people found this pattern. I was thankful for the recommendation somebody suggested to increase the seam allowance on the centre back neck, so that the edges could be finished properly, as this seam may be visible, depending on whether the collar sits up or down. The original pattern only allows for a 6mm seam allowance – I think it assumes people will overlock all the seams, negating the need for much allowance. That kind of freaked me out a bit – I’m just not used to working with such tiny allowances.

    Anyway, I did make the seam allowance on the neck larger (the normal 1.5cm), and I ended up finishing this by tucking under the allowances and stitching down through all thicknesses so that both sides of the collar had a neat appearance.

    As for adjustments, I graded out across several sizes to accommodate my small bust and wider hips; I also lengthened the sleeves a bit, and thank goodness I did! They only just ended up long enough.

    This should have been a really simple, speedy sew, but it ended up taking much longer than expected, due to the fact that:

    1) It took me ages to cut out the pieces, because I was trying to pattern match the checks, as well as waste the least possible amount of fabric. Turns out I didn’t do a particularly good job of this, and I had to fudge the side seams a bit to get the horizontal stripes to match all the way down.
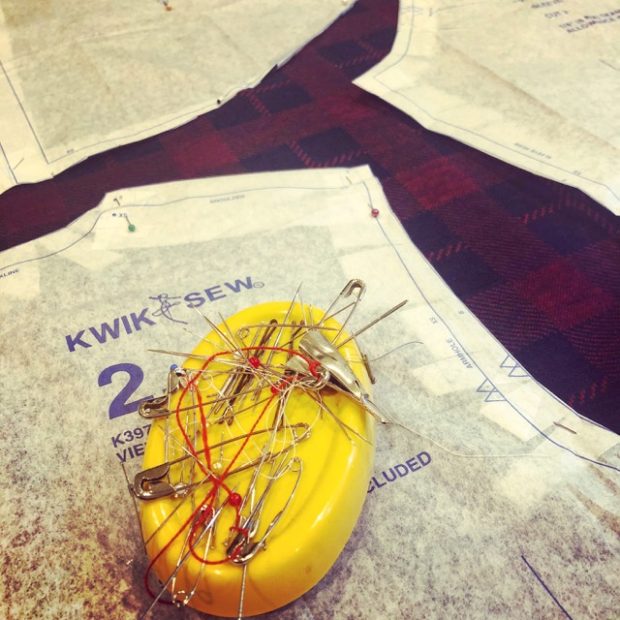
    laying out the pattern pieces and trying to match the stripes

    2) I hated how messy the inside was at the seam that joined the shoulders and collar ( stitched all in on). So I ended up cutting a strip of the same fabric and hand sewing this down on top to create a sort of binding. That took much longer than expected. It also ended up being a bit bulky by the time the edges were folded under, but I think it’s ok. It’s a bit wonky, but at the very least, it’s an improvement to the original seam!

    The finished seam of the collar contrasted with gross seam of the neckline (with a whole heap of tailors tacks still there!). I ended up stitching a bias strip over the neckline seam to neaten up – but forgot to take a photo of the end result!

    3) I couldn’t deal with the suggestion to leave all the edges unfinished (un-hemmed). So I decided to bind the sleeve and all the way around the edge of the jacket. I made a trip to a posh expensive store in the city on the quest for woollen binding to use. The lady offered to help me, and suggested a red binding. It wasn’t QUITE the same red, but I thought, “well, if she thinks it’s ok, it must be”. She then offered to help me measure the jacket to figure out how much of the binding I needed. As I was watching her, I was thinking to myself “I don’t think her measuring or her math is right”. But then I thought, “well, she’s the expert, not me”.

    Of course, when I get home that night, I find I have nowhere near enough binding. And it became evident under my lighting that the choice of red was completely off.

    Frustrated with the lady and annoyed that I didn’t trust my own judgement, I refused to go back to the store or spend any more money on the project. By this time, I was pretty over the whole thing anyway.

    So I found an old remnant of navy wool crepe in my stash and cut out my own bias binding. I had to join it together in quite a few places, as it was a rather small piece of fabric.
    I then decided to hand stitch it all down to finish the binding – I feared that I couldn’t top stitch that accurately through such thickness on a sewing machine. Again, this was quite time consuming – from memory, at least 2 episodes of Mindhunter on Netflix.
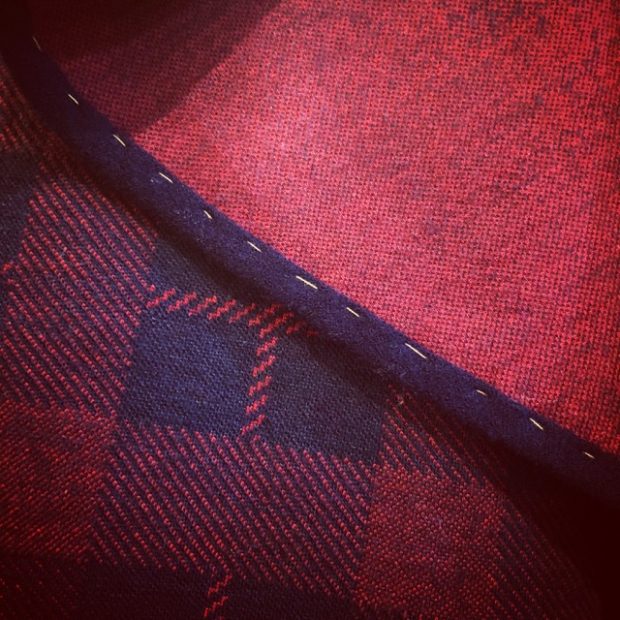
    Hand basting the binding in place before hand-stitching it permanently down.
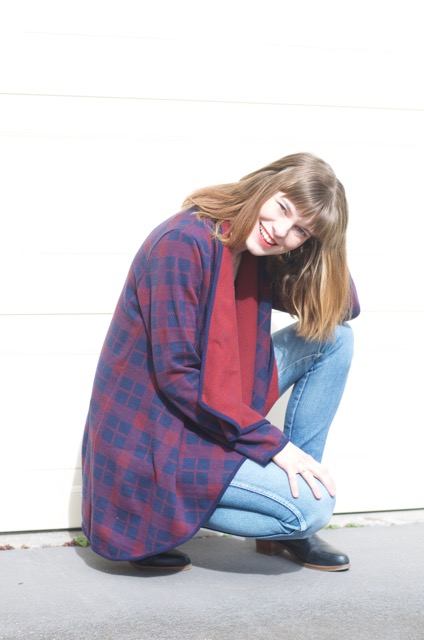
    The final product – see how low that pocket opening is?

    I couldn’t be bothered putting in two pockets, so I just did one, made from some navy cotton drill I had left over from a previous project. To me, I feel that the pocket placement is slightly too low – it almost hangs down further than the hem of the jacket, and the pocket opening seems a bit too far down the body to feel natural.
    A pocket!

    All in all, I’m reasonably happy with the end result. It doesn’t look too bad, and it’s surprisingly warm. Turns out though, I’ve hardly got anything that goes with it!! I think I’ll have to make a few plain separates next, so that I can actually wear the jacket!
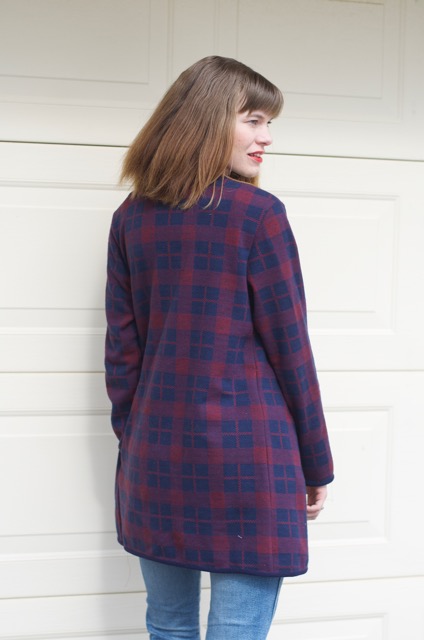
    The back – I did end up getting those strips to match, with a bit of wrangling.


  2. Vogue 9177 – Bishop dress

    June 4, 2017 by rosie

    1
    Smocked dresses instantly remind me of my childhood. My mother was always smocking dresses for me and my sister. Every special occasion was marked by the arrival of a new masterpiece: violin performances and eisteddfods, the annual Mildura show, and sometimes even Christmas and birthdays. It was always exciting when mum brought out the smocking ‘machine’ – a mysterious contraption that seemed to be capable of miracles, as the fabric went in one end taut and smooth and came out the other with perfect pleats, ready for mum to work her magic.

    Aside from the nostalgia, I’ve discovered that I find the act of smocking quite relaxing and addictive. I’ve only made a few things so far, but they have been fun to do, and surprisingly speedy (relatively speaking). Two Christmasses ago, mum got me my very own smocking machine – she bought it off an old lady who didn’t have use for it any more (I think her eyesight may have been failing) – when mum told her it was for her daughter, she was thrilled that it was going to a young person who was keen to learn and carry on the tradition.

    I’ve only been able to use the machine once so far, but I’d love to get it out again soon. I was planning to make a dress for Little Miss A’s 2nd birthday. I was on track for it too – all I had left were the buttonholes when my sewing machine decided to cark it. Six weeks passed while I waited for it to be repaired – needless (and needle-less!) to say the birthday came and went and it was a while before I got back into the swing of things and managed to finish off the dress.

    Vogue 9177 is my first attempt at a Bishop dress. This basically meant that the front and backs are sewn to the arms prior to putting it through the pleating machine. There is a fair amount of fabric involved and I was worried that it would be tricky and fiddly and that it wouldn’t go through smoothly – especially through the French seams- but, I was pleasantly surprised with the results, especially as it was my first foray into using the contraption.

    Here’s a picture of the unpleated dress, with the sleeves attached to the front and backs. So much fabric for such a little garment! It gets all rolled up on a piece of dowell, ready to be put through the pleating machine.

    2

    Here’s the dress going through the pleating machine. Magic!
    3
    4

    After the fabric is pleated, it needs to be ‘blocked’ on an ironing board and steamed into shape. This was the most fiddly part of the whole process..

    5

    After it’s been steamed and blocked for a day or so, it’s time for the fun part! Smocking!6

    The pattern came with instructions and a design for the actual smocking stitches, which meant that I didn’t have to think too hard about making up a pattern. I am slightly annoyed that I didn’t centre the design properly, even though, as you can see, I started in the centre of the garment! It doesn’t really matter, and I don’t think you can really tell, but the fact that I failed to figure this out prior to starting really bugs me. Next time!

    I decided to keep the dress simple and just use plain white embroidery floss for the whole thing. I vaguely toyed with the idea of using red instead, but the lady at the local sewing shop told me that would look tacky, so I stuck to my original vision.

    I have to say, it would have been helpful if the pattern included instructions for using a smocking machine as well as the method of picking up stitches by hand. I had to consult online and a few reference books (thanks mum!) to work out the order and method for pulling up the pleats on the smocking machine.

    I also think that without the additional diagrams and instructions I found in reference books, the instructions that accompanied the pattern would have been a little too vague, at times, to follow properly.

    The satisfying thing about making a Bishop dress is that, once the embroidery is complete, there really isn’t that much extra sewing to do before you have a completed garment! Just a neck binding, sleeve binding, side seams, hem and buttonholes and buttons and that’s it!

    Little Miss A has only worn this dress on two occasions so far. It’s pretty cute on her, and it’s nice and roomy and comfortable, which means I can layer up with singlets and spencers if the weather is a little chilly. I made the shorter length, and I was surprised by how short it really was – I ended up having a very small hem. Next time I’ll do the longer version to rectify that problem.

    This was actually a test garment to practice on before I hacked into some luscious Liberty fabric (wool and cotton blend) that I purchased with a smocked dress in mind. I’m thinking I should make it in the next size up and put it away for next year – she probably doesn’t need that many ‘party dresses’ at this stage.

    All in all, I’m pleased with the result. I reckon I’ll be using this pattern again – I’ll definitely be doing the short-sleeved version at some point for a summer dress.
    89


  3. Australian Home Journal 9044

    May 16, 2017 by rosie

    dsc_0414

    One of the problems with having small children is that they grow so quickly. In terms of sewing, this is a problem because:

    a) I finally get around to sewing her something, and then she hardly gets a chance to wear it because she grows out of it.

    b) She grows so quickly and I have minimal sewing time, so by the time I consult my (somewhat extensive) toddler sewing pattern stash, I realise with horror that half the patterns I’ve been thinking about and dying to make are no longer applicable, because they are too small. I can’t help but mourn for the patterns I may never have the chance to realise.

    So, when my little vintage Australian Home Journal coat pattern arrived in the mail, I decided that I should just go for it and make it ASAP, in order to maximise wear before winter set in. I had a feeling it would be a little on the too big side, but I figured that this was a far better outcome to have than too small – maybe she’ll even get to wear it next winter too!

    It was, of course, exactly around this time that my beloved Bernina started playing up, and I had to take it in to be serviced. SIX WEEKS LATER I was finally able to get stuck into the coat.

    This is definitely a stash slasher. The wool is left over from a project I made about five years ago; the lining was a piece of silk that had been wallowing in a tub for a couple of seasons. Even the inter-lining was a piece of Shapewell I found in mum’s sewing cupboard when I was up visiting at Easter time (thanks mum!).

    As for the pattern itself, I’m guessing it’s from around the 50’s, but that’s really a stab in the dark. I don’t think it had ever been used- it seemed to be still factory folded and I couldn’t see any signs of wear and tear or pin marks etc. I always get a little thrill when I discover an old pattern and I am able to give it another chance at becoming a real garment. Maybe the original pattern purchaser had my problem, and by the time she got around to making this coat, her child was too big for it!

    img_1520Anyway, typical of the era, there were no markings on the pattern, just a couple of punch holes that you have to decipher to tell you where the grain of the fabric is etc. And no separate pattern pieces for linings – just a brief sentence or two about how to alter the existing patterns and the assumption that the reader will figure it out.

    Similarly, the instructions are crammed onto two pieces of paper (the other sides are advertisements for buttons), with tiny hand-drawn illustrations that aren’t always completely accurate. Each ‘step’ actually contains about 4 or 5 steps in one that are sometimes only partially explained, and again, sometimes just assumed knowledge.

    The other challenge was that the front envelope illustration wasn’t a completely accurate depiction of the coat – particularly the collar, which doesn’t meet at centre, as implied in the drawing.

    I confess I did a bit of googling to brush up on bound buttonholes – the ‘instructions’ supplied just didn’t cut it for me! Plus, they used a different method to what I had used previously and I wasn’t confident it would work with such bulky fabric. In the end, the method I went with turned out pretty well in the end and were not as traumatic as I was expecting them to be.

    img_1615

    img_1617Sewing the points of the yoke was a little tricky – trickier than I was anticipating. The finished result isn’t perfect, but luckily, working with such a bulky fabric means that it’s quite forgiving. Still, every time I look at it I wish I had done a better job!

    dsc_0401

    I don’t think I’ve ever done welt pockets before, so this was a new thing for me too. They are not perfectly even which annoys me slightly but I’m glad I gave them a go – it was tempting to just sew right down that seam and omit them altogether!

    dsc_0412The lining is attached by hand to the jacket. I suppose being a child’s jacket, this task didn’t seem too onerous – not sure how I’d feel about doing this in an adult size though!

    I’ve always loved little girls’ jackets, especially with a vintage vibe. I’m glad I had the courage to give this one a go, even if the end result is far from flawless. And yes, it is too big (especially in the sleeves), which I might address at some point if I have the time.

    dsc_0417I should have given it a bit of a press before taking these photos – it had been sitting on the back seat of our car up when I popped it on her and it’s a little crumpled.

    dsc_0408

    Winter is well and truly on its way here in Victoria, so I’m glad I got it done in time. Problem is, its little headstrong owner is refusing to wear any type of jacket (or cardigan or jumper or poncho) at the moment! Maybe next year…


  4. Sweet and Simple – Simplicity 1207

    November 23, 2016 by rosie

    dsc_0051There’s nothing like the simple lines of a toddler’s dress in crisp cotton to counteract the fussiness of making a silk evening gown. For me, Simplicity 1207 was the perfect antidote to Vogue 2241– fun, straightforward and quick!

    dsc_0056

    Even better, this also doubled as a stash-slasher project. I’ve had this piece of paisley floral cotton in my stash for years – it was part of a pile of fabrics passed on to me when one of my Mum’s friends was downsizing. I’ve pulled it out quite a few times over the years and have never known quite what to do with it. While I really like the fresh zingy colours, green isn’t a colour that I feel comfortable wearing, and I just couldn’t picture it on me beyond a pair of pyjamas. The contrast watermelon pinky orange colour fabric for the contrast yoke also seems to have been part of an inherited collection of fabrics – I can’t even remember from whom – and it was a pretty close match to the colours in the paisley, so I figured it was meant to be.
    dsc_0057

    This is one of Simplicity’s new reprints of an old vintage pattern. I was surprised to find on the cover that the pattern dates from the 70’s – to me, it feels like it has an older 50/60’s look about it. Anyway, regardless of its era, I was instantly attracted to it. I liked the clean, non-fussy lines of the dress, and the scallops add just the right amount of low-key interest. I also like that the dress has little sleeves – it’s a bit more of a sun-smart option to many of the adorable vintage sundress patterns out there that are all cross over straps and pinafore/romper styles.
    simplicity-babies-toddlers-pattern-1207-envelope-frontThe dress went together quite smoothly, apart from a few silly mistakes I did (like sewing a sleeve in inside out). The only real alterations I made (if you could call them alterations), were to use an invisible zipper and to hand sew the hems on the dress, sleeves and bias binding neckline. It was good to see that the dress wasn’t massively oversized – I’ve found that many baby and toddler’s patterns just seem to be huge when they are sewn up – for once, this seemed to fit almost perfectly!

    dsc_0062

    I would love to whip up another of these dresses – they are quite fun to make! I just wish that I could find a good pattern to make some little matching pants/knickers to cover her nappy.

    dsc_0046
    These photos were taken on the first really hot day we’ve had here in Melbourne. Sadly, it’s gone back to ridiculously cold weather and we have the heater back on, despite the fact that it’s mid-November. I hope this dress gets another outing soon!

    In the meantime, I’d love to make the matching coat!


  5. Simplicity 1717

    June 23, 2014 by rosie

    skirt_june2014-4

    Wow. it’s been about 6 months since I posted anything. Where did those months go?! How can it be June – and almost July – already?!

    Needless to say, 2014 hasn’t really been the year of amazing, endless sewing productivity and inspiration. In fact, it could be fair to say that I completely lost my sewing mojo. My zeal for that, and anything else I usually enjoy, just seemed to disappear altogether. Just thinking about getting out fabric or pulling out the sewing machine made me feel overwhelmed.

    Not that the year has been completely sewing-less. I did make this dress back in February, and didn’t get around to blogging it:

    DSC_0050 (Medium) DSC_0047 (Medium)

    And then, there was the 6 meter ‘golden curtain’ I had to make in two days for work for a function. That was an interesting experience – I got to legitimately ‘work from home’…swapping my PC for my sewing machine in the name of ‘other duties as required’! It required metres and metres of fabric (over 14 metres of disgusting synthetic shiny stuff we found in the back of the work storeroom from a function years ago) – sewing in putrid hot summer heat. It was almost as long as my single-fronted house; working with such a large amount of fabric was a bit tricky to wrangle. I used fishing hooks in the bottom to weight the curtain down and I just used curtain gathering tape at the top, with some black ties to tie it on to a rigging beam.

    The end result:

    golden curtain

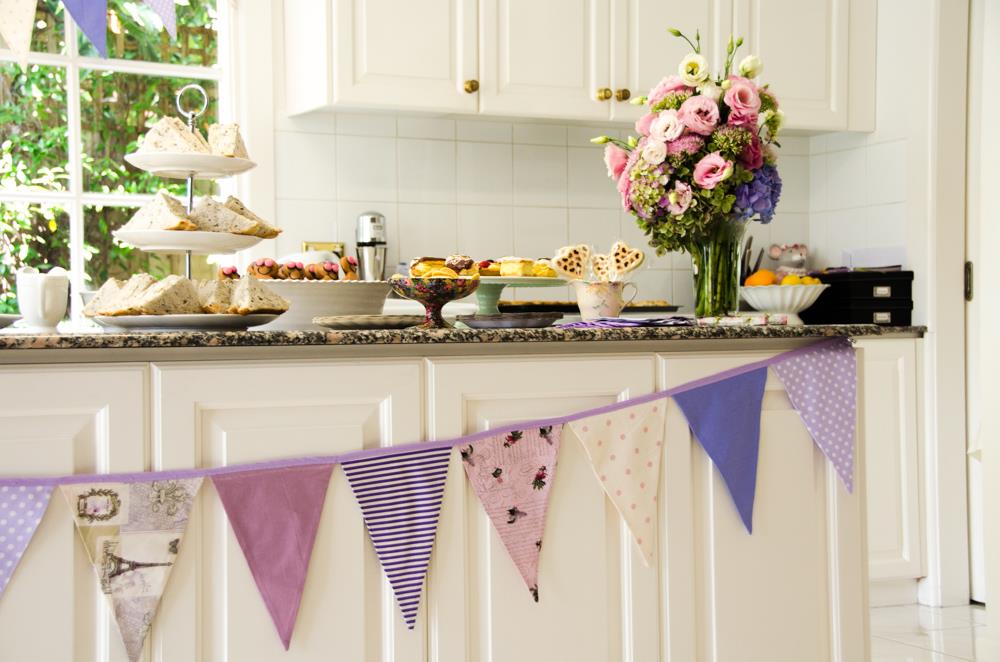
    Then there was the 14 metres of purple-themed bunting for my best friend’s Hens day. I had a very tight timeframe, so my sister came over with her sewing machine, and we set up a production line in my living room, cutting and zooming through triangles, and listening to songs on the radio from the 1980’s. Here’s a sample of just some of it:

    DSC_0074 (Medium) DSC_0077 (Medium)

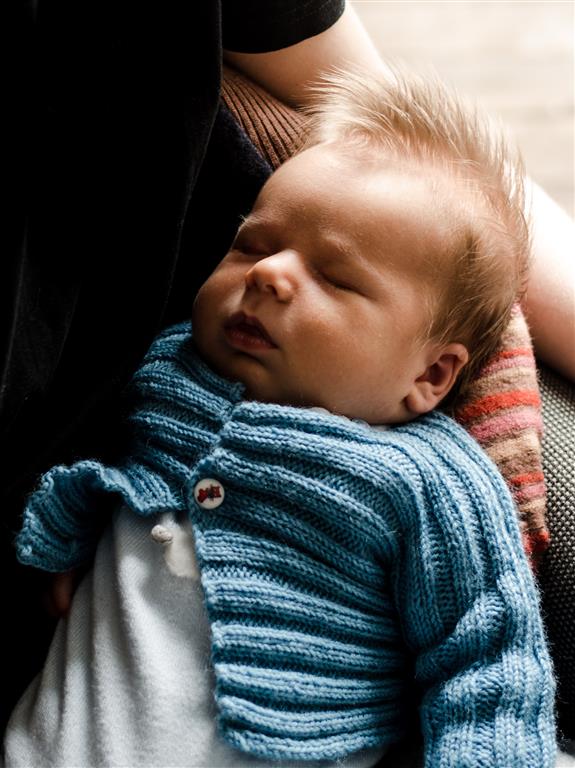
    And then I became an Aunty for the first time, (Yay!!!)  so I knitted a little cardigan to welcome Walter into the world. 7 weeks later, he’s already well and truly grown out of it!

    walter-1 walter-2

    But apart from these things – which I consider more craft than sewing – I’ve really had to force myself to get back into anything, including my sewing room. My first sewing attempt was waaaay too ambitious, and ended up being a complete and utter disaster – both financially and for my self worth! I’m not yet ready to talk about that one. Let’s just say I don’t think it’s salvageable and for the time being it’s screwed up in a ball out of sight.

    In order to ease my way back into the sewing world, I decided to be kind to myself and attempt something decidedly more achievable. Something that would be quick, straightforward and with minimal fitting or construction issues. The resulting project? – Simplicity 1717.

    skirt_june2014-6You might remember my fabric shopping spree last year. Among my purchases was a remnant of green, brown and cream check wool. Not my usual colours, but it was on sale and the green was sort of cheery.

    With winter well and truly at home in Melbourne, it was time to bring down by boxes of winter fabric. This piece seemed to fit the bill – there was just enough for the skirt, and it is so thick, it’s basically like wearing a warm woolen blanket.

    skirt_june2014-5

    It’s funny, I haven’t really worked that much with fabrics where you have to align a pattern, like a check. It was evident too. It took me AGES to lay the pieces out in a way which I thought would cause the least interruption to the check pattern. The centre seam was a bit of an issue, as this isn’t cut on the straight of the grain, so I knew that no matter what, the lines were going to look bit skewiff. However, even despite my painstaking attempts at lining things up perfectly, I realised AFTER I had cut out the pieces that I should have laid it out on the perpendicular grain, as the squares were evenly spaced that way and not that way I had cut it out. DANG!!!!!!

    skirt_june2014-3

    I decided to embrace the busy-ness of the check pattern and go with the massive over-sized pockets (who doesn’t love a pocket?!). And, in order to maximise the busy-ness, I decided to cut these on the bias, to add contrast and to detract the eye away from the (sort of mis-aligned) background check.

    I’m so glad I did! I love the pockets!

    skirt_june2014-2


    I made a few changes to this pattern, as follows:

    • I cut the pockets on a bias
    • I added a lining
    • I used lining fabric for the waistband facing, as the wool was just far too bulky
    • I didn’t hem the top of the pockets as described (again due to the thickness). Instead I just finished it off with a bias binding. (Unfortunately, I only had some lilac colour on hand, so it doesn’t exactly go)
    • lengthened the skirt a bit.

    I probably should have faced the pockets with some calico or something, to avoid it stretching. Whoops – I didn’t think of that until I was finished.

    After sewing and wearing so many retro style garments in recent years, it felt really strange to wear something that was slung lower down on my hips. Comfortable, yes, but odd. Too be honest, it’s probably a little lose. And because of the thickness of the fabric, the bulk at the seams, especially where the skirt attaches to the facing, means that it’s a bit bulky, and, kind of unflattering. It makes me look fatter than I am.

    But, it’s super comfy, it’s cheery and really warm!

    All in all, an easy pattern that didn’t have too many nasty surprises. A good project to ease back into the sewing world.


  6. Stash Slasher: McCall’s 6433

    January 23, 2014 by rosie


    McCall's 6433

    Well, I’m well and truly back at  (my actual) work, and consequently the sewing has slowed down.

    Those of you in Melbourne, especially, will also know that we’ve been experiencing some pretty extreme heatwave action last week. Consecutive days of temperature well into the 40’s means that even sewing is too much – everything, along with my brain, was fried in the heat – staying cool was pretty much the only priority for everyone.

    (On a side note, this is my first summer with short hair – what an amazing difference it makes! It’s so much cooler and less hassle, AND I can still wear a hat! )

    Anyway, this weekend there was a bit of turbo (read, sloppy) sewing action. I had cut out this dress before the heatwave, but I didn’t really get a red hot go at it until a week or go later. I decided that I just needed to get it out of my system, so there was more rushing than I would have liked, which has resulted in a few questionable finishing techniques and end results, but I’ll get to that later.

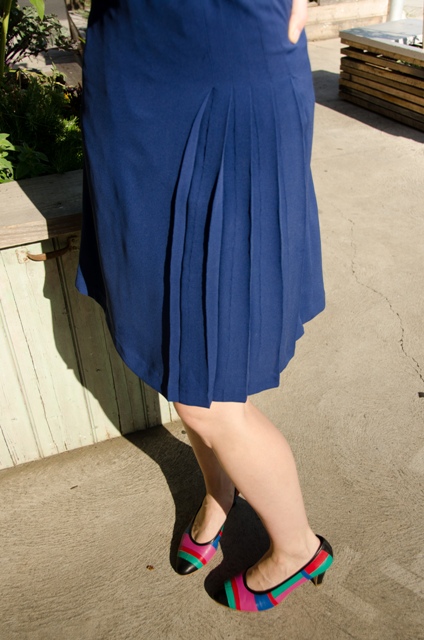
    I was instantly attracted to McCall’s 6433. I love those front pleats in the skirt and the shoulder tucks on the bodice – just enough detail to make it interesting, and yet still quite a sensible and smart dress for the office.  I think those pleats and tucks also hint at a bygone era, but it’s still quite modern. I also like how it’s not skin tight – there’s a bit of a breezy looseness to it that makes it look comfortable and cool.

    Line Art

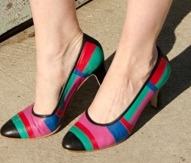
    Recently, I purchased some new shoes in the post-Christmas sales – one pair was multi-coloured (a little 1980’s ) in bright pinks, reds, blues and greens. I fell in love with them instantly, purchased them, and promptly realised that I hardly have any plain garments with which to wear them. The piece of fabric I had in mind for this project was the perfect blue, so I figured it was a sign that I should make something from it.

    new shoes

    The purchasing of these new multi-coloured shoes forced me to use this fabric

     The fabric is a blue silk crepe that I’m pretty sure I purchased from the Fabric Store on Brunswick Street a few years ago. I loved the bright rich blue, but when I got it home, I was too scared to use it. Too scared, because it felt like ‘good’ fabric, and I didn’t want to muck it up, and also because of the “drapey” properties, which I thought would be slippery and tricky to work with.

    I was right on that front. Cutting this out was tricky, and getting those tailor’s tacks in the right spot for the pleat markings was extremely difficult. The fabric has a way of sliding around and stretching, and when I was sewing the darts, it kept moving so that it was impossible to stitch where I wanted to. This meant that there was a lot of hand basting – pretty much every dart, tuck and pleat, which was very time consuming. On the other hand, the crepe is pretty amazing. I’ve never worked with it before, but it’s quite springy and malleable, and feels like it has quite a bit of natural give in it. The feel and drape of it is  pretty heavenly. I was surprised how well the pleats ironed. However, it also frays like nothing else.I have some left over from the dress that I’ll save for another project. I might even try and research how to properly deal with it next time.


    McCall's 6433

    The slippery nature of the silk crepe meant that marking the pleat lines accurately with tailor’s tacks was very difficult

    I lined the bodice with a lightweight silk/cotton blend voile that I had leftover in my stash. The bottom half, the skirt lining, is a silk that I quickly purchased from the Fabric Store.  The pattern doesn’t call for a skirt lining, but the crepe is a bit see-through and I knew that the whole thing would sit better with a lining. For the lining, I just used the skirt pattern, the back piece exactly as is, and just placing the non-pleated side of the skirt front on the fold. I wish they’d drafted a separate bodice lining without the shoulder pleats – I think this would have acted as a stay for the outer fabric, and would have helped with making sure that the under side didn’t peek out. As it is, I think because of the difficulty in cutting out the fashion fabric, I ended up having to hand baste small tucks in the lining at the very end as there was excess fabric and the lining was showing from the outside. Not a very nice finishing touch on the inside!  I’m sure many of you are horrified!


    McCall's 6433

    Front Shoulder Pleats

    McCall's 6433

    The final result…I probably should have made it a little smaller at the waist and hips, but I still wanted a blouse-y feel to it.

    I had a few issues inserting the back zip and getting the centre back skirt seams to line up. I unpicked it twice and still couldn’t get them to meet. I gave up due to the delicate fabric, but it REALLY gets to me. Even though I’ll wear a belt (a cheap, hot pink belt to match with the shoes was an emergency purchase over the weekend), I still hate it. I’m contemplating undoing all the hand stitching around the zip and unpicking the back waistline seam and lining and trying to get it to match up. At the moment it just looks really sloppy. I’m quite embarrassed by it.

    I lengthened the bodice by 1 centimeter. I probably could have even added in another 1/2 centimeter to this – I think it still sits a little high. I added more to the side seams at the hip, based on the body measurements on the packet, but I ended up having to take this, and probably more, in. The front V neckline gapes a little bit (no surprises there), so if I made this again, I would probably take some small tucks out in the pattern to make it a little more taut – I’d probably also try and do the fancy stay tape down the seam that many of the sewing books suggest (and which I knew I should have done, even as I was sewing it).


    McCall's 6433

    Will I ever be able to iron all those pleats back in?

    All in all, it’s a really lovely pattern, but not my best sewing work. I’m disappointed in myself, and also because I know that I’ll probably put this pattern away now and move on to something else, and it deserves a better outcome than the one I’ve given! I am a little worried how I’ll go ironing back all those pleats once it’s been washed, especially now that the tailor’s tacks have been removed!


  7. Stash Slasher: Simplicity 2154

    January 5, 2014 by rosie

    Simplicity 2154

    Remember my fit of pattern buying back in 2013? One of the patterns in this frenzied purchase was Simplicity 2154 – a 1960’s reproduction complete with smart pencil skirt, shirt and two jacket options. At the time, being winter, I envisioned making the suit up in my pink plaid wool, but that still hasn’t happened. This is partly because I discovered that the jacket isn’t lined (!?) , and I have not had the energy to sit down and figure out how to draft/assemble a jacket lining.

    Now that it’s summer, I thought I may as well have a crack at the blouse pattern. I’m so attracted this blouse – mainly because of that ridiculously massive, over-the-top bow. I just love it. It even looks awesome on the real life model on the pattern cover!

    For this project, I again consulted my stash. I wanted something lightweight and happy. I’m a bit of a scrooge when it comes to fabric – I’ve got quite a few lovely fabrics that would have been perfect, but if I hacked into them for this project, then I may not have had enough leftover to make a dress from it, and I didn’t want to ‘waste’ it. So I found this piece of cotton – I think it might be voile – that I’ve had sitting there since I was at university!

    I remember purchasing this piece of fabric. It was at a remnant sale at Clegs store in the city. It was opening early at 8am, and when I arrived, there was already a queue of mainly middle-aged women outside the front. As soon as the doors opened, there was this mad rush to the table where all the remnants had been laid. A frenzied flurry then ensued, of arms and legs and bosoms and elbows as the ladies’ quest to  to find ‘that’ piece of fabric turned into a formidable fight . It was a battle, and, as a relative new sewer at the time, I was way out of my league.

    But I did manage to snap up this piece of fabric. I loved the fine cotton and the bright crisp vivid colours. There wasn’t much in there, so it’s been languishing away in a tub since then.

    It’s probably not the ideal fabric to use for this design, as the busy pattern inhibits the details of the blouse’s collar and bow, but I figured it would do, and it could act as a ‘practice run’ before I ultimately make it up in something a bit more luxurious.

    I’m actually really happy with the result! This pattern gets a big thumbs up from me! It was straightforward to make, the pieces fitted together really well and it wasn’t super fiddly. For some reason, I was dreading inserting the side zipper (I had this vision of the bottom ends not matching up, as you insert it upside down), but even that went in perfectly first  time round!

    I really love the keyhole at the front and back, and of course the bow. Now, here, I must say that the pattern calls for an interfaced bow. The only interfacing I could find on hand of the right amount was probably overkill – as a result, this bow is mega stiff, and it probably could be a little softer and droopier.  I suggest that if you make this pattern, have a play with various types of interfacing before launching straight into it like I did – it might be the case that you don’t need to interface it at all. Having said that, I’m getting along just fine with my overly rigid bow.


    loving that bow!

    loving that bow!

    I took the shirt out for a quick test drive the very evening I finished making it. I dusted off my bike which had been exiled to the shed and took the blouse for a spin.

     DSC_0016

    I’ll definitely be making this one again. Next time I might make it a smidgen longer. I can’t wait to see what it does when made up in different types of fabric. My only complaint is that it doesn’t come with sleeve options – that would really have made it useful for making winter versions.

    And of course, I need to make the rest of the pattern’s family members – maybe the pencil skirt will be an easy one to whip up soon.


  8. Stash Slasher: Butterick 5708

    January 4, 2014 by rosie

    Butterick 5708

    Spotlight had their post-Christmas sale on, so I trundled off  “just to have a look”. There was such a good deal going on with patterns (excluding Vogue, of course!) that I ended up coming home with 9 of them! (I would have bought more, but they were out of stock of some of them).

    Butterick 5708 is one of these patterns. I’ve eyed it off when flicking through the pattern books on several occasions, but it had never made the cut previously. The reduced price twisted my arm, and I thought I’d give it a go.

    It’s an intriguing pattern. A reproduction of a 1953 dress, the line art on the pattern cover looks so fetching, doesn’t it? With just a change of the shoulder bow/straps, you can create various looks, from the sweet girl-next-door central image, to sophisticated cocktail dress and summertime holidaying outfit and more. And of course, the ‘models’ are all so glamorous.  Just look at them! They are so poised and coy and calm and classy, and they’ve managed to whip themselves up this dress without misplacing a single strand of their perfectly coiffed hair, and their impossibly tiny waists don’t seem to have suffered at all from the post-Christmas bulge. I want their life.

     B5708

    Part of the reason I hadn’t pursued it in the past is because, like those line drawings, it just all seems too good to be true. When I look at it, I hear warning bells in my head – it’s not possible for one dress to ‘do’ all those looks and fit and sit well. It won’t look as flattering as it does on the fictitious ladies, and with those V shaped bodice pieces, altering for sizing and fit is not going to be easy, if at all possible.

    I think this is a common problem with vintage patterns and their offerings of glamorous, non-realistic women on the cover. One must ‘filter’ internally and try and reinterpret what the pattern is really doing, and what it is likely to do on a real life figure.  I find that looking at the actual line drawings on the back of the pattern (the technical outline of the garment) often helps. For instance, in Butterick 5708, the line drawings show that in none of the variations is the bodice completely ‘wrinkle free’ – so it’s unlikely that the bodice will be super close fitting, particularly given that it’s cut on the bias. It needs to be on the bias in order to manipulate those shoulder ties into all those different shapes; because of this, there will be a certain element of drape (or, if you will, gaping) that will be inevitable.You can see that in all the views, there is an element of a cowl neckline going on. Even the ladies on the front hint at this.

    Having said that, the bias-cut lower pieces of the bodice did worry me. A quick look at other encounters with this pattern on Patternreview.com confirmed my suspicions. The pattern didn’t seem to pose a problem for a lucky few, but it seems most  people had a lot of trouble with this bodice. I think a few of these people didn’t factor in the ‘drape’ aspect of the bodice, but nevertheless, common  complaints were that the tie ends were much bigger in real life than in the drawing, that the bodice sizing runs large, and that the bias cut of the bodice pieces means that nothing sits well. Before I had even begun my version, I felt the project was doomed. I was also surprised by how many people lopped off the length of the skirt, in order to make it look more ‘modern’.  I think it needs the length to visually balance the top half. Also, the weight of the skirt probably helps to anchor down the bodice and smooth out any bias wrinkles.

    The fabric I used for my version has been in my stash for  a couple of years. It’s cotton, and not particularly fabulous quality. I bought it at Lincraft on sale – it was very cheap, and the bold hot pink florals just screamed ‘massive 50’s statement skirt’ at me. It reminded me a bit of the dress Betty Draper wears in one of the early seasons when they go picnicking and they leave all their rubbish behind.

    It’s been taking up room in my stash ever since. So much yardage is bulky, so I figured it was time to use it. Plus, as it was cheap, I wasn’t too emotionally attached to it – I didn’t care too much if the whole thing turned out to be a disaster.

    big pink flowers for summer!

    big pink flowers for summer!

    As I was feeling impatient and little grumpy, and I had a fair bit of fabric to spare, I didn’t bother making a muslin. I did the usual depressing alterations of grading out the pattern from a size 8 bust through to  a size 12. The skirt is so huge, they don’t even bother changing the pattern for the different sizes there!

    One thing I did differently that the pattern didn’t call for was I used interfacing on the lower portions of the bodice. I thought this might help to get a ‘stiffer’ look on the bottom part of the bodice, and add a bit of support to the bias cut fabric. The fusible interlining (cotton), didn’t iron on that splendidly and  there are a few wrinkles and bubbles that I just can’t get rid of.  Perhaps silk organza interlining would be been better. It’s not disastrous though. Overall, I think the interfacing probably did help, actually.

    The instructions for this dress are very sparse and not very detailed. They didn’t even tell you to reinforce and clip at the v points before joining the upper and lower bodice parts! Anyone with a bit of sewing experience has probably encountered this before, but if you were a beginner sewer, omitting this tip would really inhibit your sewing pleasure and end result. And as someone on Patternreview pointed out, they don’t bother to tell you to leave the side seam open on the opposite side for the lining- an obvious thing to do if you have made linings before, but not so obvious for the beginner. I’m not sure if these instructions are exactly as they were in the 1950’s, when a lot of knowledge was assumed, but they could really have done with a bit more detail, I think.

    I constructed my dress in a different order to that in the pattern. There was no way I was going to attach the whole massive skirt and THEN attach the bodice lining and try and deal with all that bulk and weight! I also waited until the end to insert the zipper, so I could adjust the fit (I ended up taking in the waist seam a fair bit), so I’m glad I did this.

    I also made a fabric belt, using buckram as a stiffening and a white plastic buckle I had kicking around. I find that waisted 50’s dresses look awful on me unless there is a belt to cinch in the waist – this is especially the case if the waist is gathered. And boy, is this skirt gathered!! Making this dress reminded me how much I hate gathering full skirts. Ugh!! So fiddly and annoying! Hand stitching around that hem took me hours!

    I love the full skirt (supported by a net petticoat), but not sure the bodice is so flattering


    Trying to get the ties to sit right is a little tricky

    Trying to get the ties to sit right is a little tricky


    I don’t love this dress, but I don’t hate it. I probably need to wear it out somewhere and see how I feel about it.  I love the hot pink flowers and the full skirt, but the top of the bodice is a bit…weird. The bodice drapes and cowls as anticipated – I’m just not convinced that it’s super flattering on me, particularly on such a small bust. It’s a bit fiddly and takes a while to get the ties in the right position – a bit of twisting helps, I’ve discovered, and you have to be prepared to muck around a bit with it. The fit isn’t super flattering either, but that could also be the fact that it’s January, and I haven’t worked off Christmas yet!

    Pros:

    • Awesome full skirt
    • Summery and fun design
    • Only 4 pattern pieces (plus skirt)!
    • Relatively straightforward to make

    Cons:

    • Not much room for alterations in bodice
    • weird bias-cut means not super sleek fit in lower bodice
    • difficult to get the ties/upper bodice to sit right – inevitable gaping/draping/cowl
    • You need a lot of fabric!


  9. Stash Slasher: Simplicity 1609

    January 3, 2014 by rosie

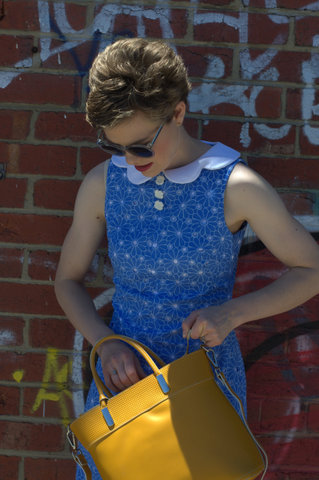
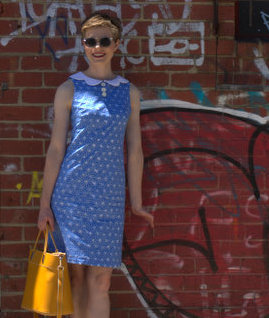
    My blue of my new dress goes well with the mustard of my new bag!

    I actually made this project in early December, but it took a while to take photos etc, and then Christmas craziness got in the way, so I’m posting this a month late.

    Simplicity 1609 is a 1960’s reproduction pattern, and the perfect project to ease my way back into sewing. It had been so long since my last project, and I wanted something quick, easy and summery as the weather had finally begun to warm up a bit.

    The fabric in question has been in my stash for a year or so. I’m pretty sure I picked it up during a sale in Spotlight – I had fallen in love with the cornflower blue and the little cutout circles in the centre of the flower motives.

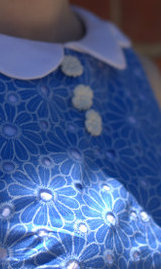
    However, there was a reason why the fabric was so cheap. If you look closely, the fabric mimics the patterns on broderie anglaise, but the flower motives are just printed, not stitched. This is fine, but what isn’t so cool is the fact that the cutout holes aren’t reinforced by stitching. I soon discovered that this makes the fabric very delicate, and the tip of the iron tends to get caught in all the holes and tears them. Once I realised this, I mentally shifted my approach to the project as a ‘test run’, rather than a ‘serious’ garment. Consequently, the final product is a bit slapdash, and I’m not entirely happy with the finish.

    This dress is a bit of fun to wear

    This dress is a bit of fun to wear

    However, the pattern itself is cool! It really is simple to sew, and is great for instant gratification. I didn’t do too much fiddling with pattern alterations – I just did the usual tapering from the bust outwards to accommodate my wide waist and hips. However, I did overcompensate a little and ended up taking a bit in around the hip area after trying it on – better to be safe than sorry though! For this dress, I did a size 8 bust, but next time I might do a 10 instead, as it’s quite narrow across my shoulders.

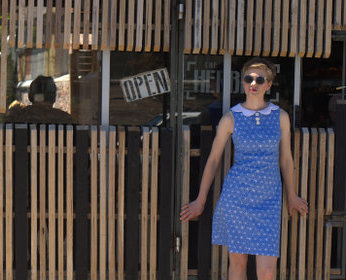
    My version of Simplicity 1609 enjoyed its debut outing at the local cafe down the road from our new place.

    My version of Simplicity 1609 enjoyed its debut outing at the local cafe down the road from our new place.

    It would have even been quicker and simpler to whip up were it not for the fact that I needed to underline the dress due to the cutout holes. I used a white lawn as a backing fabric. Originally I thought I would make the inner and outer layer separately and do away with the facings, but I soon realised that this would mean that at the seams would be flimsy wherever the cutout holes hit the seam line, and the fold back of the seam inside the dress would mean that the white wouldn’t show through near these seams. So in the end, I treated the white and the blue fabric as one, and used the facing in blue to ensure that no white would peek through around the neckline and armholes.

    I think the collar is super cute. I used a white cotton drill I had on hand, but really, this is too thick. As a result, the sewing of the scallops isn’t super precise, and was a bit bulky when turning it out and pressing to get a nice rounded finish on the outer edges. Actually, to be honest, it’s downright sloppy and the main reason why I’m a little ashamed of the dress.  I tried to roll the seam slightly to the underside (a little trickier than normal, due to the scallops), but I also forgot to trim down the excess this created from the raw, neck edge of the collar. I stupidly ended up with excess fabric underneath the collar, which I didn’t realise until I’d sewing all the facings on. I ended up hand sewing little tucks on the underside to try compensate because I was too lazy to  unpick everything, but it’s sloppy and a  bit of a botched job.  Even though nobody can see it because it’s the underside of the collar, I still know it’s there and it bothers me!


    The pesky collar!

    The pesky collar!

    However, the dress ended up being my Christmas day dress, and I still love the colour and the pattern. I’d like to make another one (maybe with the bow option), but I have so many other patterns waiting in line that I’m not sure I’ll get around to it.

    And of course, even though it’s summer, the Melbourne weather is being pathetic, and it’s too cold to wear it anywhere!

    Taking some Christmas/Summer leave means that I’ve been busy in the sewing room over the past week, and I’ve made a few other garments – photos to come soon!


  10. Vogue 1338 and gourmet tracksuit fabric: flirting with the 1980’s

    July 27, 2013 by rosie

    Red Dress 001Illness has slowed me down in my turbo sewing frenzy, but I have managed to complete another project.

    A somewhat dangerous trip to The Fabric Store on Brunswick Street resulted in purchasing of more fabric (so much for stash reduction).  They were having a sale (it’s still on, with even more reductions now!), and so my husband wisely felt that I would require his supervision. He was right, and luckily he was able to balance my euphoria and enthusiasm with a more rational approach of forcing me to justify the potential purchase for each piece of fabric fondled.

    So much temptation!

    I ended up with a few really nice pieces of fabric. A great pink and grey houndstooth wool which I think might end up as Simplicity 2154 , some awesome silk to use as lining which picks up these colours, a remnant piece of tweedy wool (not sure what I’ll make from this yet) and a few other pieces as well.

    My Fabric purchases

    But I also purchased some  dark red pure wool fleece. It was so soft and cuddly and cozy, I just had to get it. It has a very slight stretch to it, and the lady at the store felt that it would work for Vogue 1338, even though it’s not as stretchy  and is much thicker than the fabric suggested on the pattern cover. By the time I got home, I realised that I was at risk of serious 1980’s channeling – batwing sleeves, wide belt and – shcok horror – an elasticized waist! And to top it all off –I was about to make it out of what is essentially very gourmet tracksuit fabric!!!!! Was this all a very big mistake?  All I would need to complete this 1980’shorror vision would be some geometric earrings and lashings of turquoise eyeshadow…

    Nevertheless, the allure of a comfy, fuzzy, cosy dress was too much. I haven’t really sewn with many knits or stretch fabrics, and I confess that I have a bit of a fear of them. But I’m so glad that I went ahead – I’m really happy with the result.

    reddressmontage

    These photos were taken early in the morning after I had debuted the dress at the office. Consequently the dress is a bit crumpled – I really should have given it a pressing. And apologies for the low-res images.

    The pattern packet says ‘easy’, and it really is! The hardest part was laying out the pattern pieces on the fabric  for cutting out– the front bodice piece is really wide, so trying to get all the pieces to fit on with the right grain/stretch direction is a challenge. You really do need to have wide fabric to get it out.

    I love the fact that the design means that there isn’t really any fitting requirements for the bodice- it’s loose and baggy, and there aren’t even any sleeves to set in – Brilliant! I will say though, that with all the folds in the front bodice, you do  have to sew through lots of layers of fabrics – probably about 6 at some points. With my thick fabric choice, this was the equivalent of an off-road 4WD adventure, but my trusty Bernina handled it well.

    As usual, there were a few modifications:

    • The usual tapering of sizes in the side seams,

    • adding 5cm to the skirt length (thank goodness I did!)

    • Omitting the elasticized arms. This was because my chosen fabric was simply too thick to cope with the gathering caused by elastic. These arms are VERY tight – there wasn’t enough give in the arms or the fabric for further bunching up. I simply hacked off the length where I wanted it, and hemmed the bottom.

    • I didn’t have any clear elastic on hand, so I just got a thick piece of white elastic and cut it to fit my waist. I centered it over the bodice/skirt seam allowances, and stitched it down on each side. Believe it or not, I’ve never sewn with elastic before, and I did a bit of a messy job – it looks fine on the outside, but there’s a reason I’m not showing you any photos of the inside!

    I have to say, this dress is very comfortable to wear, and I was warm and snuggly in it all day. And I felt very smug with my little secret that I was, essentially, wearing tracksuit dress to work!