

Let’s ignore the fact that I haven’t posted anything on here for, well, ages.
I am attributing this to a whole range of reasons – including increased working hours, juggling a three-and-half year old, a ridiculous amount of sickness this year, and also a bit of an identity crisis triggered mainly by the devastating realisation that I need to wear orthotics, and, consequently, chunky sensible shoes. This has severely impacted what style of clothing I can wear and, consequently, my sewjo.
Anyway, moving on.
Behold Kwik Sew 3977. I haven’t used Kwik Sew much before. The styling and cover art of this is a bit dated – I’m always a bit behind the times, catching up on fashion trends just as they are fading away.
Knowing that there was the distinct possibility that this could turn into a frumpy mess, I thought I’d give it a go regardless. I wanted a long-line, easy, comfy and casual jacket I could just throw on over jeans etc.
Of course, I had nothing appropriate in my stash of fabric, but a trip to The Fabric Store in Brunswick Street solved that problem. The fabric suggestion on the pattern envelope is a bit confusing – it says it is designed for heavyweight stretch fabrics, and then it suggests fleece or boiled wool. I didn’t realise that boiled wool was considered a stretch fabric?
Anyway I found a double-sided wool/cotton that was quite thick and also had a bit of stretch to it. One side is a plain reddish colour, the other a checked blue and red. I thought given that both sides would be visible in the design, having the contrast would work well.
I checked out Pattern Review, to suss out how other people found this pattern. I was thankful for the recommendation somebody suggested to increase the seam allowance on the centre back neck, so that the edges could be finished properly, as this seam may be visible, depending on whether the collar sits up or down. The original pattern only allows for a 6mm seam allowance – I think it assumes people will overlock all the seams, negating the need for much allowance. That kind of freaked me out a bit – I’m just not used to working with such tiny allowances.
Anyway, I did make the seam allowance on the neck larger (the normal 1.5cm), and I ended up finishing this by tucking under the allowances and stitching down through all thicknesses so that both sides of the collar had a neat appearance.
As for adjustments, I graded out across several sizes to accommodate my small bust and wider hips; I also lengthened the sleeves a bit, and thank goodness I did! They only just ended up long enough.
This should have been a really simple, speedy sew, but it ended up taking much longer than expected, due to the fact that:
1) It took me ages to cut out the pieces, because I was trying to pattern match the checks, as well as waste the least possible amount of fabric. Turns out I didn’t do a particularly good job of this, and I had to fudge the side seams a bit to get the horizontal stripes to match all the way down.
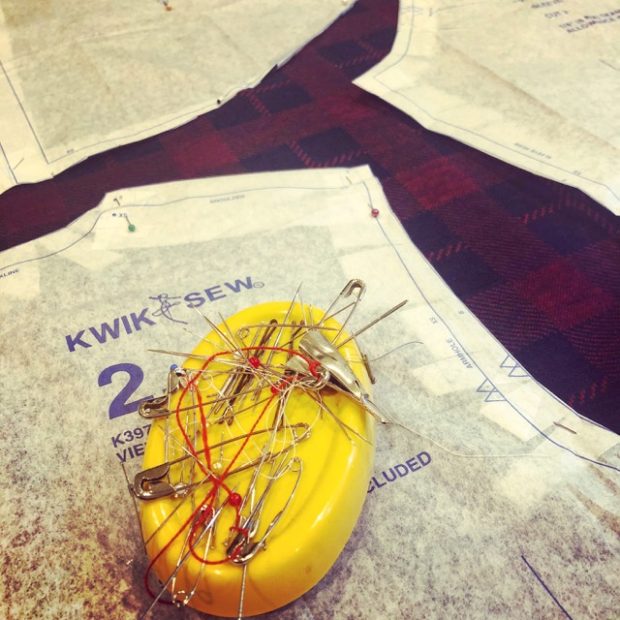
laying out the pattern pieces and trying to match the stripes
2) I hated how messy the inside was at the seam that joined the shoulders and collar ( stitched all in on). So I ended up cutting a strip of the same fabric and hand sewing this down on top to create a sort of binding. That took much longer than expected. It also ended up being a bit bulky by the time the edges were folded under, but I think it’s ok. It’s a bit wonky, but at the very least, it’s an improvement to the original seam!
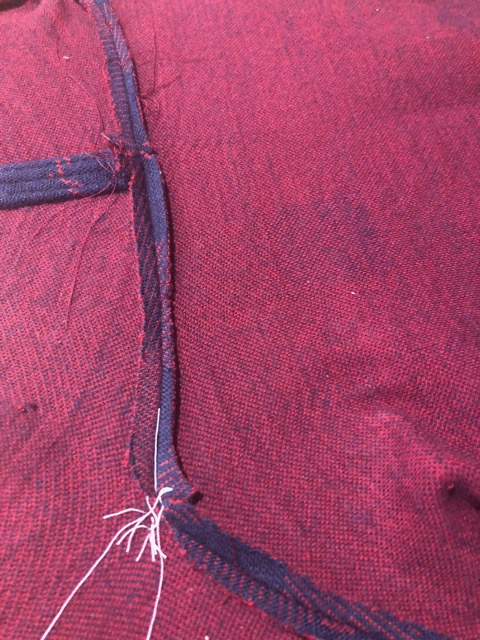
The finished seam of the collar contrasted with gross seam of the neckline (with a whole heap of tailors tacks still there!). I ended up stitching a bias strip over the neckline seam to neaten up – but forgot to take a photo of the end result!
3) I couldn’t deal with the suggestion to leave all the edges unfinished (un-hemmed). So I decided to bind the sleeve and all the way around the edge of the jacket. I made a trip to a posh expensive store in the city on the quest for woollen binding to use. The lady offered to help me, and suggested a red binding. It wasn’t QUITE the same red, but I thought, “well, if she thinks it’s ok, it must be”. She then offered to help me measure the jacket to figure out how much of the binding I needed. As I was watching her, I was thinking to myself “I don’t think her measuring or her math is right”. But then I thought, “well, she’s the expert, not me”.
Of course, when I get home that night, I find I have nowhere near enough binding. And it became evident under my lighting that the choice of red was completely off.
Frustrated with the lady and annoyed that I didn’t trust my own judgement, I refused to go back to the store or spend any more money on the project. By this time, I was pretty over the whole thing anyway.
So I found an old remnant of navy wool crepe in my stash and cut out my own bias binding. I had to join it together in quite a few places, as it was a rather small piece of fabric.
I then decided to hand stitch it all down to finish the binding – I feared that I couldn’t top stitch that accurately through such thickness on a sewing machine. Again, this was quite time consuming – from memory, at least 2 episodes of Mindhunter on Netflix.
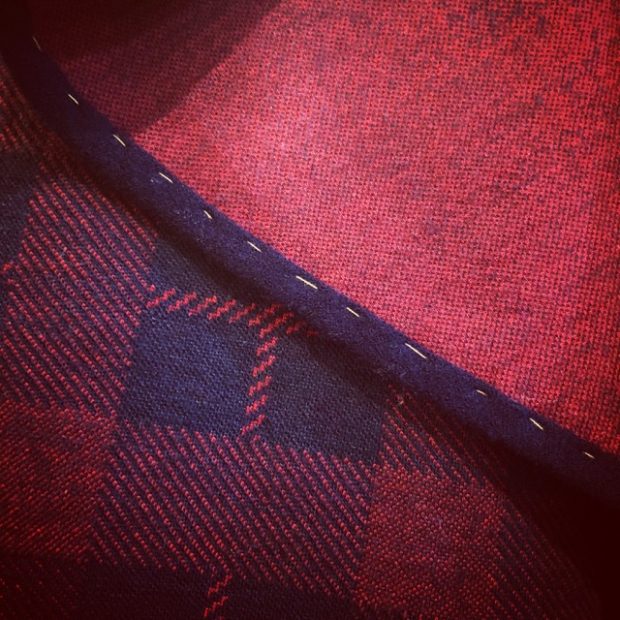
Hand basting the binding in place before hand-stitching it permanently down.

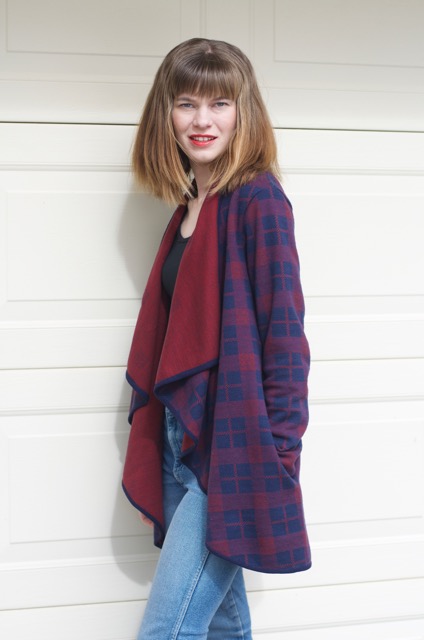
The final product – see how low that pocket opening is?
I couldn’t be bothered putting in two pockets, so I just did one, made from some navy cotton drill I had left over from a previous project. To me, I feel that the pocket placement is slightly too low – it almost hangs down further than the hem of the jacket, and the pocket opening seems a bit too far down the body to feel natural.
A pocket!
All in all, I’m reasonably happy with the end result. It doesn’t look too bad, and it’s surprisingly warm. Turns out though, I’ve hardly got anything that goes with it!! I think I’ll have to make a few plain separates next, so that I can actually wear the jacket!
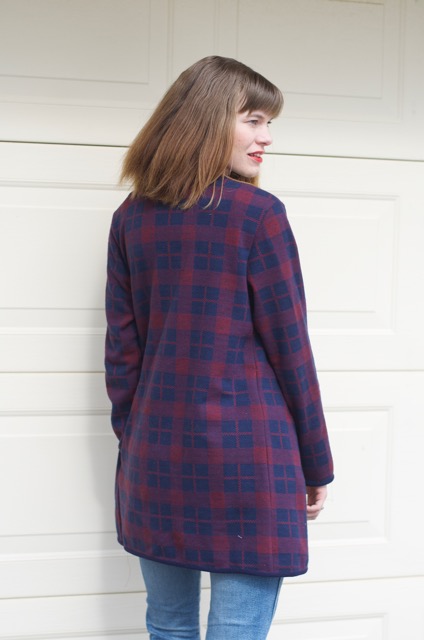
The back – I did end up getting those strips to match, with a bit of wrangling.
Warning: Trying to access array offset on value of type bool in /home4/offermag/public_html/vintagenotions/wp-content/themes/liquorice/header.php on line 28
Warning: Trying to access array offset on value of type bool in /home4/offermag/public_html/vintagenotions/wp-content/themes/liquorice/header.php on line 32
Warning: Trying to access array offset on value of type bool in /home4/offermag/public_html/vintagenotions/wp-content/themes/liquorice/header.php on line 36
RSS Feed