Warning: Trying to access array offset on value of type bool in /home4/offermag/public_html/vintagenotions/wp-content/themes/liquorice/header.php on line 28

Warning: Trying to access array offset on value of type bool in /home4/offermag/public_html/vintagenotions/wp-content/themes/liquorice/header.php on line 32

Warning: Trying to access array offset on value of type bool in /home4/offermag/public_html/vintagenotions/wp-content/themes/liquorice/header.php on line 36
RSS Feed

July, 2013

  1. Vogue 1338 and gourmet tracksuit fabric: flirting with the 1980’s

    July 27, 2013 by rosie

    Red Dress 001Illness has slowed me down in my turbo sewing frenzy, but I have managed to complete another project.

    A somewhat dangerous trip to The Fabric Store on Brunswick Street resulted in purchasing of more fabric (so much for stash reduction).  They were having a sale (it’s still on, with even more reductions now!), and so my husband wisely felt that I would require his supervision. He was right, and luckily he was able to balance my euphoria and enthusiasm with a more rational approach of forcing me to justify the potential purchase for each piece of fabric fondled.

    So much temptation!

    I ended up with a few really nice pieces of fabric. A great pink and grey houndstooth wool which I think might end up as Simplicity 2154 , some awesome silk to use as lining which picks up these colours, a remnant piece of tweedy wool (not sure what I’ll make from this yet) and a few other pieces as well.

    My Fabric purchases

    But I also purchased some  dark red pure wool fleece. It was so soft and cuddly and cozy, I just had to get it. It has a very slight stretch to it, and the lady at the store felt that it would work for Vogue 1338, even though it’s not as stretchy  and is much thicker than the fabric suggested on the pattern cover. By the time I got home, I realised that I was at risk of serious 1980’s channeling – batwing sleeves, wide belt and – shcok horror – an elasticized waist! And to top it all off –I was about to make it out of what is essentially very gourmet tracksuit fabric!!!!! Was this all a very big mistake?  All I would need to complete this 1980’shorror vision would be some geometric earrings and lashings of turquoise eyeshadow…

    Nevertheless, the allure of a comfy, fuzzy, cosy dress was too much. I haven’t really sewn with many knits or stretch fabrics, and I confess that I have a bit of a fear of them. But I’m so glad that I went ahead – I’m really happy with the result.
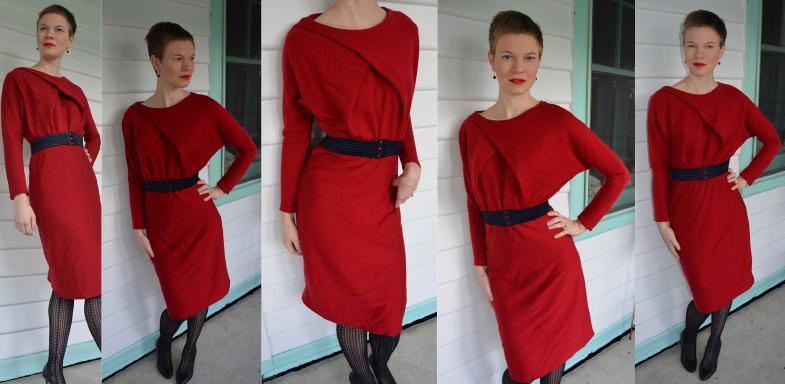
    reddressmontage

    These photos were taken early in the morning after I had debuted the dress at the office. Consequently the dress is a bit crumpled – I really should have given it a pressing. And apologies for the low-res images.

    The pattern packet says ‘easy’, and it really is! The hardest part was laying out the pattern pieces on the fabric  for cutting out– the front bodice piece is really wide, so trying to get all the pieces to fit on with the right grain/stretch direction is a challenge. You really do need to have wide fabric to get it out.

    I love the fact that the design means that there isn’t really any fitting requirements for the bodice- it’s loose and baggy, and there aren’t even any sleeves to set in – Brilliant! I will say though, that with all the folds in the front bodice, you do  have to sew through lots of layers of fabrics – probably about 6 at some points. With my thick fabric choice, this was the equivalent of an off-road 4WD adventure, but my trusty Bernina handled it well.

    As usual, there were a few modifications:

    • The usual tapering of sizes in the side seams,

    • adding 5cm to the skirt length (thank goodness I did!)

    • Omitting the elasticized arms. This was because my chosen fabric was simply too thick to cope with the gathering caused by elastic. These arms are VERY tight – there wasn’t enough give in the arms or the fabric for further bunching up. I simply hacked off the length where I wanted it, and hemmed the bottom.

    • I didn’t have any clear elastic on hand, so I just got a thick piece of white elastic and cut it to fit my waist. I centered it over the bodice/skirt seam allowances, and stitched it down on each side. Believe it or not, I’ve never sewn with elastic before, and I did a bit of a messy job – it looks fine on the outside, but there’s a reason I’m not showing you any photos of the inside!

    I have to say, this dress is very comfortable to wear, and I was warm and snuggly in it all day. And I felt very smug with my little secret that I was, essentially, wearing tracksuit dress to work!


  2. Stash Slasher: Simplicity 1913 “Think Pink!”

    July 16, 2013 by rosie

    You know those projects that look innocently painless on paper, but end up being far more trouble than they should? Simplicity 1913 was one of those for me.

    pink dress2(3)

    For something as basic as a princess line bodice and straight skirt, this dress occupied a lot more time and energy than I anticipated. This was mainly due to the fabric I chose, and some silly oversights and lack of preparation by me.

    I had some lolly-pink wool in the stash that I’d been saving for ages – I had envisaged a straight 1960’s frock in it when I purchased the fabric. When I saw Simplicity1913, I thought it was a match made in heaven. I decided to do things ‘properly’ and so I splurged on some leopard print silk (it was on sale) for the lining – such a decadent choice for a lining! I was convinced this was going to be a glamour frock.

    I deviated from the pattern’s original construction instructions a little. As well as lining the skirt (which the pattern doesn’t call for – I can’t believe that!) I also interlined the back of the skirt with silk organza (I need to find out where I can get this stuff at a cheaper price). I decided to do this as I had been re-reading Gertie’s New Book For Better Sewing, and also another book on couture techniques, both of which extol the virtues of silk organza as a stabilizer. Given that this was a very loosely woven fabric, I felt the back of the skirt might sag, and could do with some extra reinforcement. I also reinforced the zipper with silk organza. I haven’t done either of these before, so I’ll be interested to see how the dress wears.

    This dress is designed to sit above the natural waistline (something I failed to notice until I had cut out the fabric). After making this dress, I don’t think I’m a fan of higher-than-usual waist lines for fitted things. If I made it again, I would be lengthening the waistline. As it is, I did a .5cm seam allowance on the join to try and add in a bit more length.

    In my haste to start the sewing, I COMPLETELY forgot to cut out the lengthened hemline (I always make the hems longer than the pattern does, due to most of my height coming from my legs). I am still berating myself for this – such a stupid mistake!!! I did the tiniest hem possible (bias binding), and I think it’s only just passable. Personally, I feel the dress looks silly this short. If you are on the tallish side, I highly recommend lengthening this dress.

    DSC_0235 (9)

    The other thing that totally didn’t work for me was the gathered waist in the skirt. Maybe it was the bulkier fabric choice, but this just looked terrible on me – far too much bulk and extremely unflattering. I improvised by putting two tucks in the front to get rid of the excess fabric, and by fashioning two darts in the back. I guess the result doesn’t look too bad.

    One thing that really  annoyed me about the pattern/construction was the collar. This is stitched onto the bodice after the lining has been attached. However, the instructions just tell you to leave the edges of the collar raw and exposed. I was shocked!!!! How ugly – and on the outside of the dress! Even though, in theory, this seam allowance is covered by the collar, I still feel that this is scandalous. Once I realised, I had to do something. I didn’t have any binding in an appropriate colour, and it was late at night, so I improvised by sewing this grosgrain ribbon (which was actually a decoration on a wrapped present I was given at Christmas) to neaten up the raw edges. This isn’t ideal – too bulky and springy to do neatly – but still, it’s better than nothing.

    I ended up not lining the sleeves – partly because I tend to get hot in the office during winter, and partly because I loved the lining fabric so much that I decided to make a matching neck bow to place at the collar with the remaining fabric.(Note, I was in such a hurry to wear the dress that I didn’t have time to stitch on the tie for the photos – I wore it to work all day with only two sewing pins holding it on! I think I will make it detachable by putting two little buttons underneath the collar to which the tie can attach).DSC_0243

    By the time I was ready to sew on buttons, I was fed up with the entire dress. I felt I had spent too much money on an outfit that didn’t come up to scratch, and which hadn’t fulfilled my vision – I wasn’t going to spend any more on it! All the buttons I loved were metallic and beyond the ‘budget’ for this dress ($2.50 per button adds up when you have to purchase 8 or so!). I went for some cheap and nasty plastic ones instead. The shop only had 6 left, so I had to be stingy with how many I could use (I had to be quite strategic and careful about where to space the buttons for the bust, to avoid unfortunate placings!). It turns out, these buttons annoy me in their plastic tackiness, so I’ll keep an eye out for some metallic ones in second hand shops and see if I can upgrade down the track.

    DSC_0240 (4)  DSC_0243


    The final change I made to the original pattern was the addition of a structured belt. Because of the dodgy .5cm seam allowance, the waistline isn’t sewn very neatly – it’s a bit uneven, and it needs hiding. It’s also still higher than I’d like, so a wide belt helps the ‘allusion’ of a longer bodice. It also helps to cinch in the waist a bit – I feel this dress isn’t very flattering, and has the opposite of a slimming effect (again, I think the bulky fabric is partly to blame).

    With the amount of re-picking and altering and silly mistakes,  I had to spend some time away from the dress in order to recompose myself and not end up completely hating it. Revisiting it now, and after a very positive debut at the office,  perhaps it isn’t too disastrous? I do love the pink and gold combination.  In fact, I feel like I could step into the  “Think Pink” scene from the timeless Audrey Hepburn classic ‘Funny Face’. And that can only be a good thing, so perhaps this dress will grow on me after all….


  3. Stash Slasher: Burda 7125

    July 7, 2013 by rosie

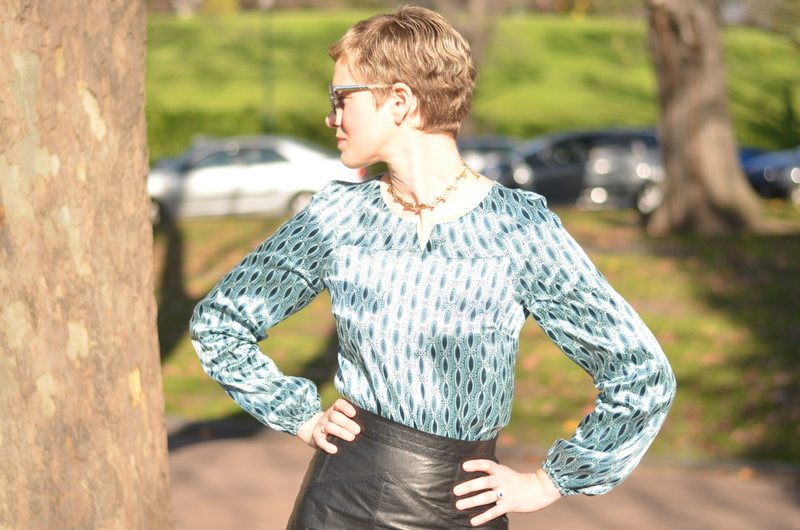
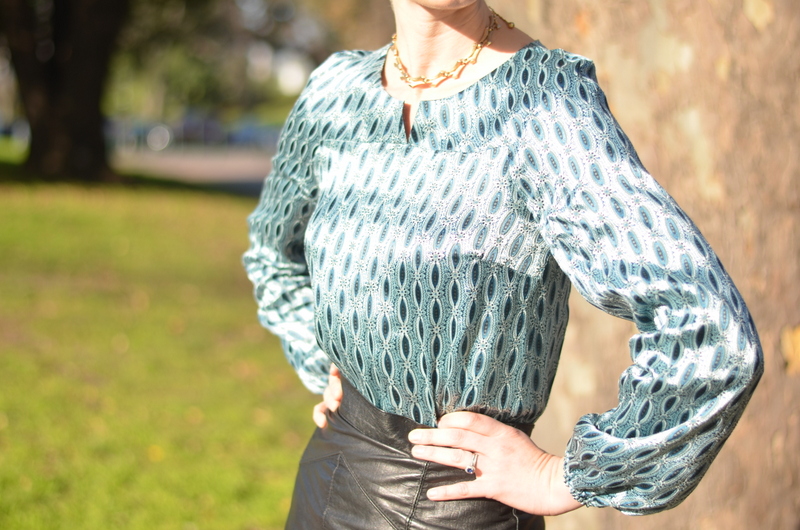
    DSC_0216This is the first of my recent pattern purchases to be made up into a finished garment. I chose this one because it looked quick and easy – no zipper, no buttonholes, no real fitting!

    However, it took longer than it should have – mainly because of user error!

    The fabric I chose was something I’ve had sitting around for years. I bought it when Darn Cheap Fabrics in Newport was still in existence, and when I was still a student. This combination of store name and my own limited student finances means that, even though at the time  I felt it was an extravagant and ‘special’ purchase  – it is silk after all – it turns out the quality of the fabric isn’t that great. However, I couldn’t part with it, and it actually made it easier for me to hack into it once I realised that it didn’t matter too much if I stuffed the whole thing up. And I still love the colours.

    I decided to line the upper yoke/sleeve part in just a plain thin silk lining I had kicking around from a previous project. This worked out fine, although some of it peeks out a tiny bit around the neckline facing which annoys me slightly, but I can live with that. It’s not too terrible.DSC_0214

    I made the usual depressing size alterations – size 8 bust/sleeve, tapering out the side seams to a whopping size 12 by the time I get to the hips.

    I started out thinking that I would do the whole thing properly and commit to french seams – at least for the side seams. But I wasn’t sure if I would have to take it in anywhere, and I just couldn’t face the prospect of french seaming everything, and attaching the top half of the top, only to have to unppick it all to readjust the fit. So I ended up being lazy and overlocking the edges to stop the fraying. Lately I’ve noticed that lots of people spend the time and effort doing beautiful seam finishes on their garments (binding, french seaming etc), and I really wish I could be one of those types of sewers. It puts the insides of my garments to shame.

    Things were going along swimmingly, until I got to the part where I was meant to turn through the lining for the yoke/sleeve section. The instructions just say ‘turn’, and my poor little brain just couldn’t figure out HOW to turn it through. I ended up with this hideous tangle of sleeves, but for the life of me, I couldn’t get it to turn through. I’m sure there must be a way, but I was tired and impatient and  I just couldn’t figure out the logic to make it work. Grumpy and defeated, I ended up unpicking the lower sleeve hem (where the sleeve is joined to the lining right sides together) and instead cut out a rectangle of the fashion fabric to make a little cuff that would be the casing for the elastic. This worked out fine, but the slippery fabric made this a little more fiddly and messy to deal with. Then, of course, I couldn’t find a safety pin small enough to fit through the tiny channels for the elastic, so I spent a very long time trying to feed the elastic through using various other articles. Once I had done that and tried it on, I realised that in one of the arms, the sleeve lining and somehow twisted.  More unpicking!

    DSC_0217  The rest of the garment went together pretty easily. At the end, the inside of the top looked so messy around the armholes and where the yoke joined the body of the top, I had to do something. I felt that the bias binding I had on hand would be too stiff and bulky for the fabric used to use as a binding, so instead I improvised and decided to use the seam allowance of the black lining to wrap around the other seam allowances and act as a binding to encase all the raw edges. I hand stitched this around the armholes and yoke seams, and although it’s not perfect, it’s a whole lot better, and definitely worth the little bit of extra time. Because I had already clipped into the corners where the needle pivots around corners, these edges aren’t perfectly neatened on the inside, but it’s better than nothing.

    All in all, I’m generally  happy with the result. It’s not an amazing, show-stopping pattern, so neither is the finished product. (I wore it to work and it went through the day unnoticed by friends and colleagues), but it’s comfortable and the fabric feels nice against the skin.  It’s a useful basic wardrobe item, and no doubt I’ll probably make more down the track. I’d like to experiment with using two contrasting fabrics and colours at some point.


  4. Pattern Purchasing Frenzy!

    July 2, 2013 by rosie

    My goodness! It’s July already, and I’ve only written a handful of posts. I make one very pathetic blogger.

    Having said that, my absence can be explained, in part, by my getting married. I am now a Mrs! While this happened at the end of April, let me tell you, despite my best efforts to remain calm and not delve into Brideszilla territory, the lead up to and preparations for the wedding still sucked up A LOT of my time. (Handy hint – if you plan on getting married, plan on not having any spare time to devote to other ‘projects’…like sewing, or socializing, or cleaning.)

    A month-long honeymoon in the northern hemisphere’s late springtime weather, followed by post-wedding/return- to-work blues, the obligatory bout of winter illness and a lot of post-wedding-follow ups means that my sewing room has been abandoned for months.

    Now that I’m feeling back on track, my sewing libido has well and truly returned with a vengeance.  This has been encouraged by two other factors:
    1) I went the ‘big chop’ and got all my hair cut off.  I’ve never done this before, but I am now sporting a Mia Farrow-esque ‘do’. While I love it, it has been the catalyst for a bit of a wardrobe crisis. I used to channel Betty Draper’s hair and outfits – now all of a sudden, I’m looking at things that are a bit more ‘modern’, and half of my go-to ensembles simply don’t go with my new look.
    2) There have been a lot of stocktake sales going on. And while I have been very good and promised my husband that I will endeavour to make a dent in my enormous fabric stash before purchasing more fabric, I calmly and rationally stated my case and justified my need to obtain new sewing patterns that would contribute towards solving the problem outlined in reason 1.
    So here are some of the patterns I snapped up:

    patterns

    Clockwise from top left:

    Butterick 5608:OK, so the illustration makes this look super daggy. And there’s the chance that it will be. But I thought that the two on the right might be a good staple for when summer comes along. So often I’ll make a skirt and realise I have nothing that matches with it. I also have a few lengths of fabric that aren’t  long enough to do much with, but I might be able to squeeze out a few of these tops from them. I’ll probably file this pattern away and wait until the sun is a little warmer for the time being.

    Simplicity 3833: Another haircut-friendly ‘mod’ 1960’s look. I like the two tone potential (a good way of using up remnants!). Although it’s pictured on the pattern cover as a summer frock, I want to try and make it into a
    sleeveless pinafore to wear now during the winter months. I’m not sure if I’ll need to do any alterations (maybe lower the arm holes a little?)

    Burda 7114: How could I resist? I think the short hair will work with this! It looks easy and quick and isn’t particularly special, but it looks comfy and something that will get me back into the swing of things. And it has pockets!! I like the winter and the summer version, but my priority will be the ones with sleeves to wear with bright tights and my new boots (purchased in Florence during our honeymoon!). There are a few potential fabric candidates in my stash for this one – I’ll have to double check the lengths and thickness of some of them to see what will work best.

    Simplicity 1913: I’m really liking the few Project Runway patterns that I have, particularly how they come with lots of options and bits and pieces to play with. I like both the slim skirt and the flared version, and will probably end up making both. Right now I have some lolly pink wool in my stash that I want to make the ¾ sleeve version with collar and slim skirt.

    Simplicity 1717: I know I could probably sit down and draft something similar to this if I tried, but it would take so much time and space and patience, and this was half price and already done! It’s a very basic pattern, but I do love an A line skirt. And it has pockets (OK, so they are just basic patch pockets you could easily make up, but I’ll ignore that.) I’m curious about the longer length skirt, too. l I always thought that this was a bit of a ‘naff’ length, but lately I’m curious. It would be nice and warm and swishy in winter, and maybe when paired with my new boots, it wouldn’t look so daggy? My priority though is to whip up a winter version of the skirt pictured on the cover with some left over wool pieces.

    Vogue1340: Ok, this had nothing to do with my hair, or my remnant stash. I just liked the crisp lines and the subtle bodice detail with the pleats.  Very sharp and elegant

    Burda 7125: Nothing particularly mind-blowing about this pattern, but I like how it’s got potential for contrasting fabrics (great for stash slashing!) in the yoke/sleeves vs the main body of the shirt. I’m also attracted to the way it’s a bit loose and billowy. I’m hoping this will be a quick and easy project to run up (especially view A – no buttons!)

    Simplicity 2154: I’ve had my eye on this pattern for ages and couldn’t resist. What isn’t there to love? A librarian pencil skirt and matching jacket. And that bow! I just love that bow! I know this is a bit more old
    fashioned, and less ‘mod’, but I think I can make it work with the hair. And again, I should be able to find some remnants in my stash for this project.

    Vogue 1338: This is a little more modern day, but the pattern intrigues me. I’m not very good at working with knit fabrics, and I love the way the construction is all drapey and triangle-y. I have some wool knit somewhere in
    my stash that I inteded for this, but once I read the back of the pattern I realized it’s cut on the bias, so I’m not sure if I’ll actually have enough. I may have to make some fabric purchases after all. If I can successfully make it, I think this would be a very comfy, cosy and office-friendly dress to wear. I’m a little scared of it though – my previous attempts at sewing with knits left me questioning my sewing ability.

    So there you go! Now that I’ve posted this online, I’m going to have stick to my word and make at least a few of these projects, so watch this space!

    I have to admit, it was VERY difficult for me not to go out and buy the usual suspects – the 1940’s reproduction patterns with the beautiful curves, drapes, pleats and details, or the Betty Draper-esque 1950’s frocks with full skirts and demure bodices and bows and collars. Luckily my long-suffering and super patient husband accompanied and supervised my purchases to make sure I stuck to my self-imposed requirements.

    Now I had better get cracking and start sewing!