Warning: Trying to access array offset on value of type bool in /home4/offermag/public_html/vintagenotions/wp-content/themes/liquorice/header.php on line 28

Warning: Trying to access array offset on value of type bool in /home4/offermag/public_html/vintagenotions/wp-content/themes/liquorice/header.php on line 32

Warning: Trying to access array offset on value of type bool in /home4/offermag/public_html/vintagenotions/wp-content/themes/liquorice/header.php on line 36
RSS Feed

‘1950’s’ Category

  1. Australian Home Journal 9044

    May 16, 2017 by rosie

    dsc_0414

    One of the problems with having small children is that they grow so quickly. In terms of sewing, this is a problem because:

    a) I finally get around to sewing her something, and then she hardly gets a chance to wear it because she grows out of it.

    b) She grows so quickly and I have minimal sewing time, so by the time I consult my (somewhat extensive) toddler sewing pattern stash, I realise with horror that half the patterns I’ve been thinking about and dying to make are no longer applicable, because they are too small. I can’t help but mourn for the patterns I may never have the chance to realise.

    So, when my little vintage Australian Home Journal coat pattern arrived in the mail, I decided that I should just go for it and make it ASAP, in order to maximise wear before winter set in. I had a feeling it would be a little on the too big side, but I figured that this was a far better outcome to have than too small – maybe she’ll even get to wear it next winter too!

    It was, of course, exactly around this time that my beloved Bernina started playing up, and I had to take it in to be serviced. SIX WEEKS LATER I was finally able to get stuck into the coat.

    This is definitely a stash slasher. The wool is left over from a project I made about five years ago; the lining was a piece of silk that had been wallowing in a tub for a couple of seasons. Even the inter-lining was a piece of Shapewell I found in mum’s sewing cupboard when I was up visiting at Easter time (thanks mum!).

    As for the pattern itself, I’m guessing it’s from around the 50’s, but that’s really a stab in the dark. I don’t think it had ever been used- it seemed to be still factory folded and I couldn’t see any signs of wear and tear or pin marks etc. I always get a little thrill when I discover an old pattern and I am able to give it another chance at becoming a real garment. Maybe the original pattern purchaser had my problem, and by the time she got around to making this coat, her child was too big for it!

    img_1520Anyway, typical of the era, there were no markings on the pattern, just a couple of punch holes that you have to decipher to tell you where the grain of the fabric is etc. And no separate pattern pieces for linings – just a brief sentence or two about how to alter the existing patterns and the assumption that the reader will figure it out.

    Similarly, the instructions are crammed onto two pieces of paper (the other sides are advertisements for buttons), with tiny hand-drawn illustrations that aren’t always completely accurate. Each ‘step’ actually contains about 4 or 5 steps in one that are sometimes only partially explained, and again, sometimes just assumed knowledge.

    The other challenge was that the front envelope illustration wasn’t a completely accurate depiction of the coat – particularly the collar, which doesn’t meet at centre, as implied in the drawing.

    I confess I did a bit of googling to brush up on bound buttonholes – the ‘instructions’ supplied just didn’t cut it for me! Plus, they used a different method to what I had used previously and I wasn’t confident it would work with such bulky fabric. In the end, the method I went with turned out pretty well in the end and were not as traumatic as I was expecting them to be.

    img_1615

    img_1617Sewing the points of the yoke was a little tricky – trickier than I was anticipating. The finished result isn’t perfect, but luckily, working with such a bulky fabric means that it’s quite forgiving. Still, every time I look at it I wish I had done a better job!

    dsc_0401

    I don’t think I’ve ever done welt pockets before, so this was a new thing for me too. They are not perfectly even which annoys me slightly but I’m glad I gave them a go – it was tempting to just sew right down that seam and omit them altogether!

    dsc_0412The lining is attached by hand to the jacket. I suppose being a child’s jacket, this task didn’t seem too onerous – not sure how I’d feel about doing this in an adult size though!

    I’ve always loved little girls’ jackets, especially with a vintage vibe. I’m glad I had the courage to give this one a go, even if the end result is far from flawless. And yes, it is too big (especially in the sleeves), which I might address at some point if I have the time.

    dsc_0417I should have given it a bit of a press before taking these photos – it had been sitting on the back seat of our car up when I popped it on her and it’s a little crumpled.

    dsc_0408

    Winter is well and truly on its way here in Victoria, so I’m glad I got it done in time. Problem is, its little headstrong owner is refusing to wear any type of jacket (or cardigan or jumper or poncho) at the moment! Maybe next year…


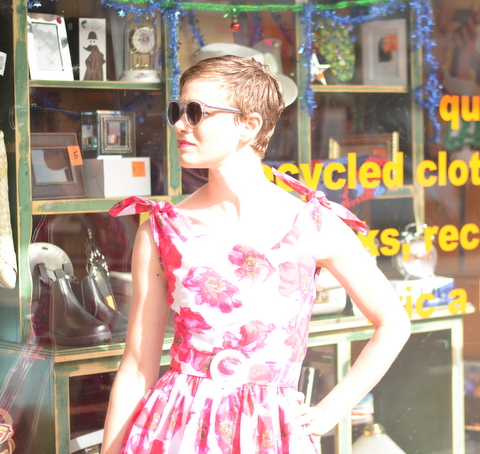
  2. Stash Slasher: Butterick 5708

    January 4, 2014 by rosie

    Butterick 5708

    Spotlight had their post-Christmas sale on, so I trundled off  “just to have a look”. There was such a good deal going on with patterns (excluding Vogue, of course!) that I ended up coming home with 9 of them! (I would have bought more, but they were out of stock of some of them).

    Butterick 5708 is one of these patterns. I’ve eyed it off when flicking through the pattern books on several occasions, but it had never made the cut previously. The reduced price twisted my arm, and I thought I’d give it a go.

    It’s an intriguing pattern. A reproduction of a 1953 dress, the line art on the pattern cover looks so fetching, doesn’t it? With just a change of the shoulder bow/straps, you can create various looks, from the sweet girl-next-door central image, to sophisticated cocktail dress and summertime holidaying outfit and more. And of course, the ‘models’ are all so glamorous.  Just look at them! They are so poised and coy and calm and classy, and they’ve managed to whip themselves up this dress without misplacing a single strand of their perfectly coiffed hair, and their impossibly tiny waists don’t seem to have suffered at all from the post-Christmas bulge. I want their life.

     B5708

    Part of the reason I hadn’t pursued it in the past is because, like those line drawings, it just all seems too good to be true. When I look at it, I hear warning bells in my head – it’s not possible for one dress to ‘do’ all those looks and fit and sit well. It won’t look as flattering as it does on the fictitious ladies, and with those V shaped bodice pieces, altering for sizing and fit is not going to be easy, if at all possible.

    I think this is a common problem with vintage patterns and their offerings of glamorous, non-realistic women on the cover. One must ‘filter’ internally and try and reinterpret what the pattern is really doing, and what it is likely to do on a real life figure.  I find that looking at the actual line drawings on the back of the pattern (the technical outline of the garment) often helps. For instance, in Butterick 5708, the line drawings show that in none of the variations is the bodice completely ‘wrinkle free’ – so it’s unlikely that the bodice will be super close fitting, particularly given that it’s cut on the bias. It needs to be on the bias in order to manipulate those shoulder ties into all those different shapes; because of this, there will be a certain element of drape (or, if you will, gaping) that will be inevitable.You can see that in all the views, there is an element of a cowl neckline going on. Even the ladies on the front hint at this.

    Having said that, the bias-cut lower pieces of the bodice did worry me. A quick look at other encounters with this pattern on Patternreview.com confirmed my suspicions. The pattern didn’t seem to pose a problem for a lucky few, but it seems most  people had a lot of trouble with this bodice. I think a few of these people didn’t factor in the ‘drape’ aspect of the bodice, but nevertheless, common  complaints were that the tie ends were much bigger in real life than in the drawing, that the bodice sizing runs large, and that the bias cut of the bodice pieces means that nothing sits well. Before I had even begun my version, I felt the project was doomed. I was also surprised by how many people lopped off the length of the skirt, in order to make it look more ‘modern’.  I think it needs the length to visually balance the top half. Also, the weight of the skirt probably helps to anchor down the bodice and smooth out any bias wrinkles.

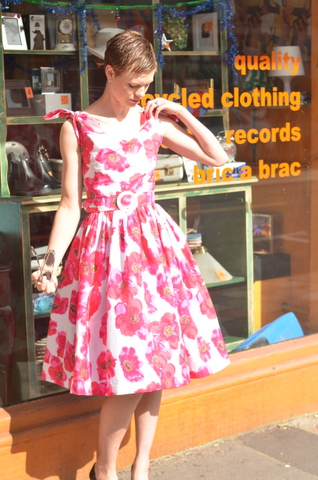
    The fabric I used for my version has been in my stash for  a couple of years. It’s cotton, and not particularly fabulous quality. I bought it at Lincraft on sale – it was very cheap, and the bold hot pink florals just screamed ‘massive 50’s statement skirt’ at me. It reminded me a bit of the dress Betty Draper wears in one of the early seasons when they go picnicking and they leave all their rubbish behind.

    It’s been taking up room in my stash ever since. So much yardage is bulky, so I figured it was time to use it. Plus, as it was cheap, I wasn’t too emotionally attached to it – I didn’t care too much if the whole thing turned out to be a disaster.

    big pink flowers for summer!

    big pink flowers for summer!

    As I was feeling impatient and little grumpy, and I had a fair bit of fabric to spare, I didn’t bother making a muslin. I did the usual depressing alterations of grading out the pattern from a size 8 bust through to  a size 12. The skirt is so huge, they don’t even bother changing the pattern for the different sizes there!

    One thing I did differently that the pattern didn’t call for was I used interfacing on the lower portions of the bodice. I thought this might help to get a ‘stiffer’ look on the bottom part of the bodice, and add a bit of support to the bias cut fabric. The fusible interlining (cotton), didn’t iron on that splendidly and  there are a few wrinkles and bubbles that I just can’t get rid of.  Perhaps silk organza interlining would be been better. It’s not disastrous though. Overall, I think the interfacing probably did help, actually.

    The instructions for this dress are very sparse and not very detailed. They didn’t even tell you to reinforce and clip at the v points before joining the upper and lower bodice parts! Anyone with a bit of sewing experience has probably encountered this before, but if you were a beginner sewer, omitting this tip would really inhibit your sewing pleasure and end result. And as someone on Patternreview pointed out, they don’t bother to tell you to leave the side seam open on the opposite side for the lining- an obvious thing to do if you have made linings before, but not so obvious for the beginner. I’m not sure if these instructions are exactly as they were in the 1950’s, when a lot of knowledge was assumed, but they could really have done with a bit more detail, I think.

    I constructed my dress in a different order to that in the pattern. There was no way I was going to attach the whole massive skirt and THEN attach the bodice lining and try and deal with all that bulk and weight! I also waited until the end to insert the zipper, so I could adjust the fit (I ended up taking in the waist seam a fair bit), so I’m glad I did this.

    I also made a fabric belt, using buckram as a stiffening and a white plastic buckle I had kicking around. I find that waisted 50’s dresses look awful on me unless there is a belt to cinch in the waist – this is especially the case if the waist is gathered. And boy, is this skirt gathered!! Making this dress reminded me how much I hate gathering full skirts. Ugh!! So fiddly and annoying! Hand stitching around that hem took me hours!

    I love the full skirt (supported by a net petticoat), but not sure the bodice is so flattering


    Trying to get the ties to sit right is a little tricky

    Trying to get the ties to sit right is a little tricky


    I don’t love this dress, but I don’t hate it. I probably need to wear it out somewhere and see how I feel about it.  I love the hot pink flowers and the full skirt, but the top of the bodice is a bit…weird. The bodice drapes and cowls as anticipated – I’m just not convinced that it’s super flattering on me, particularly on such a small bust. It’s a bit fiddly and takes a while to get the ties in the right position – a bit of twisting helps, I’ve discovered, and you have to be prepared to muck around a bit with it. The fit isn’t super flattering either, but that could also be the fact that it’s January, and I haven’t worked off Christmas yet!

    Pros:

    • Awesome full skirt
    • Summery and fun design
    • Only 4 pattern pieces (plus skirt)!
    • Relatively straightforward to make

    Cons:

    • Not much room for alterations in bodice
    • weird bias-cut means not super sleek fit in lower bodice
    • difficult to get the ties/upper bodice to sit right – inevitable gaping/draping/cowl
    • You need a lot of fabric!


  3. Bound for Glory! (almost) – in pursuit of the perfect bound buttonhole.

    February 11, 2013 by rosie

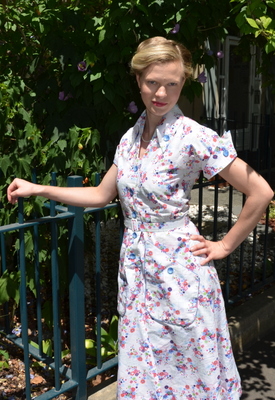
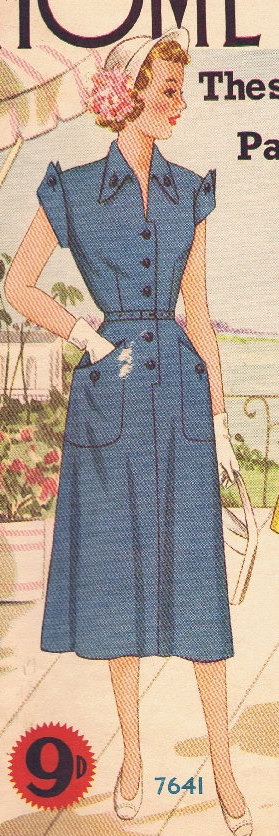
    After what feels like an eternity and a thousand set-backs, I have finally completed my AHJ Frock No. 7641 from September 1, 1950. Yes, remember that dress I started ages ago, with the overly ambitious small bust adjustment? That SBA was stressful. But, it did end up working – sort of – with a lot of wrangling and ‘ad lib’.

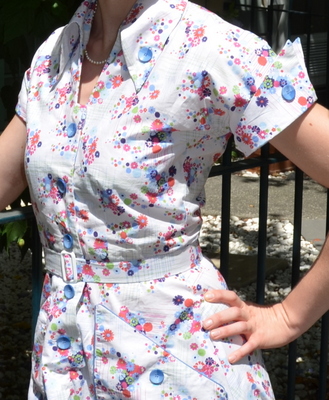
    The reason I chose this dress in the first place was because I wanted to overcome my fear of bound buttonholes. With 13 of the suckers, I figured this dress was sure to put me on track.  Plus, I was also attracted to the ridiculously huge pockets.

    I consulted the Readers Digest in addition to Gertie’s new Book for Better sewing. The instructions and diagrams in this are great, and I highly recommend it. Warning though: Bound buttonholes are just as time consuming as you’d think!!!

    I must admit though, my bound buttonholes still aren’t as perfect as I hoped. I think they did improve as I went along. I did the window facing with silk organza for the facing as well – I had to do these entirely by hand for  the two buttonholes in the corner of the collar, as the angle was too acute for me to use the sewing machine by the time I had attached the facing to the collar. I suppose I shouldn’t aim or expect perfection for the my first time, and overall, I’m fairly happy with the dress.

    The fitting did cause some issues – I had to use 6 cm seam allowances rather than the normal 1.5, and I ended up fitting the front and back darts by ‘eye’ retrospectively (well, mum did the fitting when I went home to visit one weekend.) There’s one bit in the front (the bottom of the button hole facing bit) that doesn’t sit particularly well, and I’ll have to go back and hand sew it down a bit, but I think I can pull it off, overall.


    A bit crumpled from being at work all day, but you get the idea. The SBA didn't turn out too shabby after all!

    A bit crumpled from being at work all day, but you get the idea. The SBA didn’t turn out too shabby after all!

    The original pattern

    bound buttonholes are everywhere - collars, sleeves, opening and pockets!

    bound buttonholes are everywhere – collars, sleeves, opening and pockets!