Warning: Trying to access array offset on value of type bool in /home4/offermag/public_html/vintagenotions/wp-content/themes/liquorice/header.php on line 28

Warning: Trying to access array offset on value of type bool in /home4/offermag/public_html/vintagenotions/wp-content/themes/liquorice/header.php on line 32

Warning: Trying to access array offset on value of type bool in /home4/offermag/public_html/vintagenotions/wp-content/themes/liquorice/header.php on line 36
RSS Feed

January, 2014

  1. Stash Slasher: McCall’s 6433

    January 23, 2014 by rosie


    McCall's 6433

    Well, I’m well and truly back at  (my actual) work, and consequently the sewing has slowed down.

    Those of you in Melbourne, especially, will also know that we’ve been experiencing some pretty extreme heatwave action last week. Consecutive days of temperature well into the 40’s means that even sewing is too much – everything, along with my brain, was fried in the heat – staying cool was pretty much the only priority for everyone.

    (On a side note, this is my first summer with short hair – what an amazing difference it makes! It’s so much cooler and less hassle, AND I can still wear a hat! )

    Anyway, this weekend there was a bit of turbo (read, sloppy) sewing action. I had cut out this dress before the heatwave, but I didn’t really get a red hot go at it until a week or go later. I decided that I just needed to get it out of my system, so there was more rushing than I would have liked, which has resulted in a few questionable finishing techniques and end results, but I’ll get to that later.

    I was instantly attracted to McCall’s 6433. I love those front pleats in the skirt and the shoulder tucks on the bodice – just enough detail to make it interesting, and yet still quite a sensible and smart dress for the office.  I think those pleats and tucks also hint at a bygone era, but it’s still quite modern. I also like how it’s not skin tight – there’s a bit of a breezy looseness to it that makes it look comfortable and cool.

    Line Art

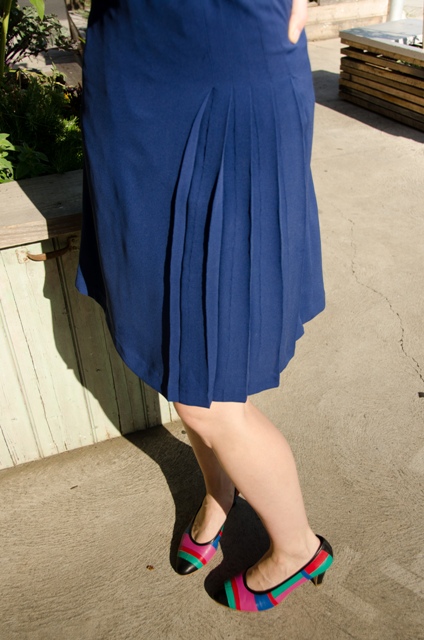
    Recently, I purchased some new shoes in the post-Christmas sales – one pair was multi-coloured (a little 1980’s ) in bright pinks, reds, blues and greens. I fell in love with them instantly, purchased them, and promptly realised that I hardly have any plain garments with which to wear them. The piece of fabric I had in mind for this project was the perfect blue, so I figured it was a sign that I should make something from it.

    new shoes

    The purchasing of these new multi-coloured shoes forced me to use this fabric

     The fabric is a blue silk crepe that I’m pretty sure I purchased from the Fabric Store on Brunswick Street a few years ago. I loved the bright rich blue, but when I got it home, I was too scared to use it. Too scared, because it felt like ‘good’ fabric, and I didn’t want to muck it up, and also because of the “drapey” properties, which I thought would be slippery and tricky to work with.

    I was right on that front. Cutting this out was tricky, and getting those tailor’s tacks in the right spot for the pleat markings was extremely difficult. The fabric has a way of sliding around and stretching, and when I was sewing the darts, it kept moving so that it was impossible to stitch where I wanted to. This meant that there was a lot of hand basting – pretty much every dart, tuck and pleat, which was very time consuming. On the other hand, the crepe is pretty amazing. I’ve never worked with it before, but it’s quite springy and malleable, and feels like it has quite a bit of natural give in it. The feel and drape of it is  pretty heavenly. I was surprised how well the pleats ironed. However, it also frays like nothing else.I have some left over from the dress that I’ll save for another project. I might even try and research how to properly deal with it next time.


    McCall's 6433

    The slippery nature of the silk crepe meant that marking the pleat lines accurately with tailor’s tacks was very difficult

    I lined the bodice with a lightweight silk/cotton blend voile that I had leftover in my stash. The bottom half, the skirt lining, is a silk that I quickly purchased from the Fabric Store.  The pattern doesn’t call for a skirt lining, but the crepe is a bit see-through and I knew that the whole thing would sit better with a lining. For the lining, I just used the skirt pattern, the back piece exactly as is, and just placing the non-pleated side of the skirt front on the fold. I wish they’d drafted a separate bodice lining without the shoulder pleats – I think this would have acted as a stay for the outer fabric, and would have helped with making sure that the under side didn’t peek out. As it is, I think because of the difficulty in cutting out the fashion fabric, I ended up having to hand baste small tucks in the lining at the very end as there was excess fabric and the lining was showing from the outside. Not a very nice finishing touch on the inside!  I’m sure many of you are horrified!


    McCall's 6433

    Front Shoulder Pleats

    McCall's 6433

    The final result…I probably should have made it a little smaller at the waist and hips, but I still wanted a blouse-y feel to it.

    I had a few issues inserting the back zip and getting the centre back skirt seams to line up. I unpicked it twice and still couldn’t get them to meet. I gave up due to the delicate fabric, but it REALLY gets to me. Even though I’ll wear a belt (a cheap, hot pink belt to match with the shoes was an emergency purchase over the weekend), I still hate it. I’m contemplating undoing all the hand stitching around the zip and unpicking the back waistline seam and lining and trying to get it to match up. At the moment it just looks really sloppy. I’m quite embarrassed by it.

    I lengthened the bodice by 1 centimeter. I probably could have even added in another 1/2 centimeter to this – I think it still sits a little high. I added more to the side seams at the hip, based on the body measurements on the packet, but I ended up having to take this, and probably more, in. The front V neckline gapes a little bit (no surprises there), so if I made this again, I would probably take some small tucks out in the pattern to make it a little more taut – I’d probably also try and do the fancy stay tape down the seam that many of the sewing books suggest (and which I knew I should have done, even as I was sewing it).


    McCall's 6433

    Will I ever be able to iron all those pleats back in?

    All in all, it’s a really lovely pattern, but not my best sewing work. I’m disappointed in myself, and also because I know that I’ll probably put this pattern away now and move on to something else, and it deserves a better outcome than the one I’ve given! I am a little worried how I’ll go ironing back all those pleats once it’s been washed, especially now that the tailor’s tacks have been removed!


  2. Stash Slasher: Simplicity 2154

    January 5, 2014 by rosie

    Simplicity 2154

    Remember my fit of pattern buying back in 2013? One of the patterns in this frenzied purchase was Simplicity 2154 – a 1960’s reproduction complete with smart pencil skirt, shirt and two jacket options. At the time, being winter, I envisioned making the suit up in my pink plaid wool, but that still hasn’t happened. This is partly because I discovered that the jacket isn’t lined (!?) , and I have not had the energy to sit down and figure out how to draft/assemble a jacket lining.

    Now that it’s summer, I thought I may as well have a crack at the blouse pattern. I’m so attracted this blouse – mainly because of that ridiculously massive, over-the-top bow. I just love it. It even looks awesome on the real life model on the pattern cover!

    For this project, I again consulted my stash. I wanted something lightweight and happy. I’m a bit of a scrooge when it comes to fabric – I’ve got quite a few lovely fabrics that would have been perfect, but if I hacked into them for this project, then I may not have had enough leftover to make a dress from it, and I didn’t want to ‘waste’ it. So I found this piece of cotton – I think it might be voile – that I’ve had sitting there since I was at university!

    I remember purchasing this piece of fabric. It was at a remnant sale at Clegs store in the city. It was opening early at 8am, and when I arrived, there was already a queue of mainly middle-aged women outside the front. As soon as the doors opened, there was this mad rush to the table where all the remnants had been laid. A frenzied flurry then ensued, of arms and legs and bosoms and elbows as the ladies’ quest to  to find ‘that’ piece of fabric turned into a formidable fight . It was a battle, and, as a relative new sewer at the time, I was way out of my league.

    But I did manage to snap up this piece of fabric. I loved the fine cotton and the bright crisp vivid colours. There wasn’t much in there, so it’s been languishing away in a tub since then.

    It’s probably not the ideal fabric to use for this design, as the busy pattern inhibits the details of the blouse’s collar and bow, but I figured it would do, and it could act as a ‘practice run’ before I ultimately make it up in something a bit more luxurious.

    I’m actually really happy with the result! This pattern gets a big thumbs up from me! It was straightforward to make, the pieces fitted together really well and it wasn’t super fiddly. For some reason, I was dreading inserting the side zipper (I had this vision of the bottom ends not matching up, as you insert it upside down), but even that went in perfectly first  time round!

    I really love the keyhole at the front and back, and of course the bow. Now, here, I must say that the pattern calls for an interfaced bow. The only interfacing I could find on hand of the right amount was probably overkill – as a result, this bow is mega stiff, and it probably could be a little softer and droopier.  I suggest that if you make this pattern, have a play with various types of interfacing before launching straight into it like I did – it might be the case that you don’t need to interface it at all. Having said that, I’m getting along just fine with my overly rigid bow.


    loving that bow!

    loving that bow!

    I took the shirt out for a quick test drive the very evening I finished making it. I dusted off my bike which had been exiled to the shed and took the blouse for a spin.

     DSC_0016

    I’ll definitely be making this one again. Next time I might make it a smidgen longer. I can’t wait to see what it does when made up in different types of fabric. My only complaint is that it doesn’t come with sleeve options – that would really have made it useful for making winter versions.

    And of course, I need to make the rest of the pattern’s family members – maybe the pencil skirt will be an easy one to whip up soon.


  3. Stash Slasher: Butterick 5708

    January 4, 2014 by rosie

    Butterick 5708

    Spotlight had their post-Christmas sale on, so I trundled off  “just to have a look”. There was such a good deal going on with patterns (excluding Vogue, of course!) that I ended up coming home with 9 of them! (I would have bought more, but they were out of stock of some of them).

    Butterick 5708 is one of these patterns. I’ve eyed it off when flicking through the pattern books on several occasions, but it had never made the cut previously. The reduced price twisted my arm, and I thought I’d give it a go.

    It’s an intriguing pattern. A reproduction of a 1953 dress, the line art on the pattern cover looks so fetching, doesn’t it? With just a change of the shoulder bow/straps, you can create various looks, from the sweet girl-next-door central image, to sophisticated cocktail dress and summertime holidaying outfit and more. And of course, the ‘models’ are all so glamorous.  Just look at them! They are so poised and coy and calm and classy, and they’ve managed to whip themselves up this dress without misplacing a single strand of their perfectly coiffed hair, and their impossibly tiny waists don’t seem to have suffered at all from the post-Christmas bulge. I want their life.

     B5708

    Part of the reason I hadn’t pursued it in the past is because, like those line drawings, it just all seems too good to be true. When I look at it, I hear warning bells in my head – it’s not possible for one dress to ‘do’ all those looks and fit and sit well. It won’t look as flattering as it does on the fictitious ladies, and with those V shaped bodice pieces, altering for sizing and fit is not going to be easy, if at all possible.

    I think this is a common problem with vintage patterns and their offerings of glamorous, non-realistic women on the cover. One must ‘filter’ internally and try and reinterpret what the pattern is really doing, and what it is likely to do on a real life figure.  I find that looking at the actual line drawings on the back of the pattern (the technical outline of the garment) often helps. For instance, in Butterick 5708, the line drawings show that in none of the variations is the bodice completely ‘wrinkle free’ – so it’s unlikely that the bodice will be super close fitting, particularly given that it’s cut on the bias. It needs to be on the bias in order to manipulate those shoulder ties into all those different shapes; because of this, there will be a certain element of drape (or, if you will, gaping) that will be inevitable.You can see that in all the views, there is an element of a cowl neckline going on. Even the ladies on the front hint at this.

    Having said that, the bias-cut lower pieces of the bodice did worry me. A quick look at other encounters with this pattern on Patternreview.com confirmed my suspicions. The pattern didn’t seem to pose a problem for a lucky few, but it seems most  people had a lot of trouble with this bodice. I think a few of these people didn’t factor in the ‘drape’ aspect of the bodice, but nevertheless, common  complaints were that the tie ends were much bigger in real life than in the drawing, that the bodice sizing runs large, and that the bias cut of the bodice pieces means that nothing sits well. Before I had even begun my version, I felt the project was doomed. I was also surprised by how many people lopped off the length of the skirt, in order to make it look more ‘modern’.  I think it needs the length to visually balance the top half. Also, the weight of the skirt probably helps to anchor down the bodice and smooth out any bias wrinkles.

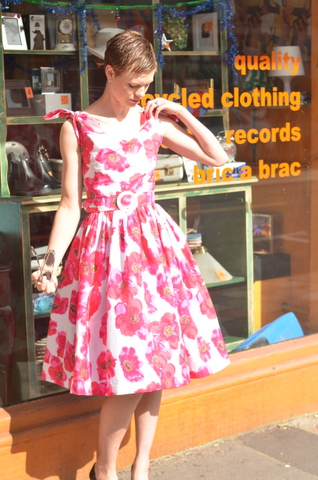
    The fabric I used for my version has been in my stash for  a couple of years. It’s cotton, and not particularly fabulous quality. I bought it at Lincraft on sale – it was very cheap, and the bold hot pink florals just screamed ‘massive 50’s statement skirt’ at me. It reminded me a bit of the dress Betty Draper wears in one of the early seasons when they go picnicking and they leave all their rubbish behind.

    It’s been taking up room in my stash ever since. So much yardage is bulky, so I figured it was time to use it. Plus, as it was cheap, I wasn’t too emotionally attached to it – I didn’t care too much if the whole thing turned out to be a disaster.

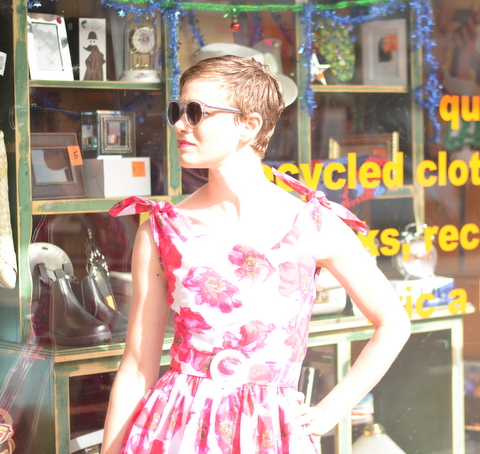
    big pink flowers for summer!

    big pink flowers for summer!

    As I was feeling impatient and little grumpy, and I had a fair bit of fabric to spare, I didn’t bother making a muslin. I did the usual depressing alterations of grading out the pattern from a size 8 bust through to  a size 12. The skirt is so huge, they don’t even bother changing the pattern for the different sizes there!

    One thing I did differently that the pattern didn’t call for was I used interfacing on the lower portions of the bodice. I thought this might help to get a ‘stiffer’ look on the bottom part of the bodice, and add a bit of support to the bias cut fabric. The fusible interlining (cotton), didn’t iron on that splendidly and  there are a few wrinkles and bubbles that I just can’t get rid of.  Perhaps silk organza interlining would be been better. It’s not disastrous though. Overall, I think the interfacing probably did help, actually.

    The instructions for this dress are very sparse and not very detailed. They didn’t even tell you to reinforce and clip at the v points before joining the upper and lower bodice parts! Anyone with a bit of sewing experience has probably encountered this before, but if you were a beginner sewer, omitting this tip would really inhibit your sewing pleasure and end result. And as someone on Patternreview pointed out, they don’t bother to tell you to leave the side seam open on the opposite side for the lining- an obvious thing to do if you have made linings before, but not so obvious for the beginner. I’m not sure if these instructions are exactly as they were in the 1950’s, when a lot of knowledge was assumed, but they could really have done with a bit more detail, I think.

    I constructed my dress in a different order to that in the pattern. There was no way I was going to attach the whole massive skirt and THEN attach the bodice lining and try and deal with all that bulk and weight! I also waited until the end to insert the zipper, so I could adjust the fit (I ended up taking in the waist seam a fair bit), so I’m glad I did this.

    I also made a fabric belt, using buckram as a stiffening and a white plastic buckle I had kicking around. I find that waisted 50’s dresses look awful on me unless there is a belt to cinch in the waist – this is especially the case if the waist is gathered. And boy, is this skirt gathered!! Making this dress reminded me how much I hate gathering full skirts. Ugh!! So fiddly and annoying! Hand stitching around that hem took me hours!

    I love the full skirt (supported by a net petticoat), but not sure the bodice is so flattering


    Trying to get the ties to sit right is a little tricky

    Trying to get the ties to sit right is a little tricky


    I don’t love this dress, but I don’t hate it. I probably need to wear it out somewhere and see how I feel about it.  I love the hot pink flowers and the full skirt, but the top of the bodice is a bit…weird. The bodice drapes and cowls as anticipated – I’m just not convinced that it’s super flattering on me, particularly on such a small bust. It’s a bit fiddly and takes a while to get the ties in the right position – a bit of twisting helps, I’ve discovered, and you have to be prepared to muck around a bit with it. The fit isn’t super flattering either, but that could also be the fact that it’s January, and I haven’t worked off Christmas yet!

    Pros:

    • Awesome full skirt
    • Summery and fun design
    • Only 4 pattern pieces (plus skirt)!
    • Relatively straightforward to make

    Cons:

    • Not much room for alterations in bodice
    • weird bias-cut means not super sleek fit in lower bodice
    • difficult to get the ties/upper bodice to sit right – inevitable gaping/draping/cowl
    • You need a lot of fabric!


  4. Stash Slasher: Simplicity 1609

    January 3, 2014 by rosie

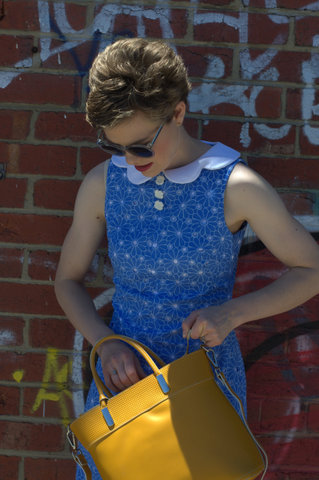
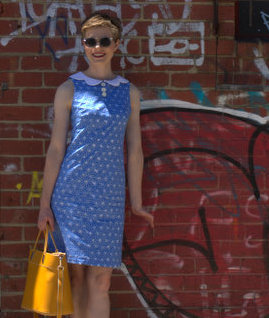
    My blue of my new dress goes well with the mustard of my new bag!

    I actually made this project in early December, but it took a while to take photos etc, and then Christmas craziness got in the way, so I’m posting this a month late.

    Simplicity 1609 is a 1960’s reproduction pattern, and the perfect project to ease my way back into sewing. It had been so long since my last project, and I wanted something quick, easy and summery as the weather had finally begun to warm up a bit.

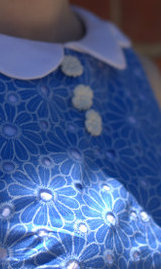
    The fabric in question has been in my stash for a year or so. I’m pretty sure I picked it up during a sale in Spotlight – I had fallen in love with the cornflower blue and the little cutout circles in the centre of the flower motives.

    However, there was a reason why the fabric was so cheap. If you look closely, the fabric mimics the patterns on broderie anglaise, but the flower motives are just printed, not stitched. This is fine, but what isn’t so cool is the fact that the cutout holes aren’t reinforced by stitching. I soon discovered that this makes the fabric very delicate, and the tip of the iron tends to get caught in all the holes and tears them. Once I realised this, I mentally shifted my approach to the project as a ‘test run’, rather than a ‘serious’ garment. Consequently, the final product is a bit slapdash, and I’m not entirely happy with the finish.

    This dress is a bit of fun to wear

    This dress is a bit of fun to wear

    However, the pattern itself is cool! It really is simple to sew, and is great for instant gratification. I didn’t do too much fiddling with pattern alterations – I just did the usual tapering from the bust outwards to accommodate my wide waist and hips. However, I did overcompensate a little and ended up taking a bit in around the hip area after trying it on – better to be safe than sorry though! For this dress, I did a size 8 bust, but next time I might do a 10 instead, as it’s quite narrow across my shoulders.

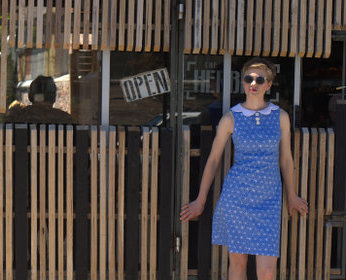
    My version of Simplicity 1609 enjoyed its debut outing at the local cafe down the road from our new place.

    My version of Simplicity 1609 enjoyed its debut outing at the local cafe down the road from our new place.

    It would have even been quicker and simpler to whip up were it not for the fact that I needed to underline the dress due to the cutout holes. I used a white lawn as a backing fabric. Originally I thought I would make the inner and outer layer separately and do away with the facings, but I soon realised that this would mean that at the seams would be flimsy wherever the cutout holes hit the seam line, and the fold back of the seam inside the dress would mean that the white wouldn’t show through near these seams. So in the end, I treated the white and the blue fabric as one, and used the facing in blue to ensure that no white would peek through around the neckline and armholes.

    I think the collar is super cute. I used a white cotton drill I had on hand, but really, this is too thick. As a result, the sewing of the scallops isn’t super precise, and was a bit bulky when turning it out and pressing to get a nice rounded finish on the outer edges. Actually, to be honest, it’s downright sloppy and the main reason why I’m a little ashamed of the dress.  I tried to roll the seam slightly to the underside (a little trickier than normal, due to the scallops), but I also forgot to trim down the excess this created from the raw, neck edge of the collar. I stupidly ended up with excess fabric underneath the collar, which I didn’t realise until I’d sewing all the facings on. I ended up hand sewing little tucks on the underside to try compensate because I was too lazy to  unpick everything, but it’s sloppy and a  bit of a botched job.  Even though nobody can see it because it’s the underside of the collar, I still know it’s there and it bothers me!


    The pesky collar!

    The pesky collar!

    However, the dress ended up being my Christmas day dress, and I still love the colour and the pattern. I’d like to make another one (maybe with the bow option), but I have so many other patterns waiting in line that I’m not sure I’ll get around to it.

    And of course, even though it’s summer, the Melbourne weather is being pathetic, and it’s too cold to wear it anywhere!

    Taking some Christmas/Summer leave means that I’ve been busy in the sewing room over the past week, and I’ve made a few other garments – photos to come soon!


  5. A Burning Desire: conducting a flame test on fabrics

    January 2, 2014 by rosie

    After a ridiculous hiatus (involving moving house and all the associated trauma), I’ve finally set up the sewing room. It was the last room in the house to be sorted. This is mainly because we’ve downsized and now my fabric stash and associated sewing paraphernalia is more overwhelming than ever before, and finding a way to make it all fit proved challenging.

    Moving house did remind me just how much sewing stuff I have – whether it be fabric or patterns. It makes me feel a little guilty – I really should stop buying both, as I already have years’ worth to keep me going, and so much of it has been left untouched for so long.

    I’ve promised my husband that I’ll try really hard to reduce my fabric stash this year. And I’ve promised myself that this year, there will be more sewing action than in 2013.

    One of the first things I did once we’d settled into our new house was something I’ve been hankering to do for a while, but wasn’t exactly sure how to go about it. I did a burn test on various pieces of “mystery” fabrics.  It was like those science experiments we did back in high school – I felt I should have donned a lab coat and plastic goggles, and written out my ‘hypothesis’, ‘method’ and ‘conclusion’ in my notebooks.

    Instead, I convinced my husband to help me out, and we set fire to various strips of  ‘unsub’ fabric – mainly pieces I had thrifted or inherited over the years –  on a baking tray over the kitchen table to see if we could determine the fibre content. I used this website as my reference point.

    I must say, I was pleasantly surprised by how much the process revealed about the fibres. While there are obvious limitations to the exercise – such as not being able to identify the exact make-up of blends, or the precise type of fibre – it soon became evident which of the fabrics were made of natural fibres and which weren’t.  There are several clues – the way the fabric burns (or melts, if it’s some disgusting plastic chemical), they way it smells, and the residue/ashes the fabric leaves behind.

    Let’s just say that, as a result of the burn test, many pieces of fabric were swiftly thrown out or donated to the local charity – after inhaling the sickening chemical smell and watching the samples drip and melt into a congealed blob, there was no way I wanted to be wearing any of those pieces! Sadly, there was one great 1960’s piece I’d been given that I’d been holding onto for years because of the colours – even though I had my suspicions, I was secretly hoping it would prove to be all natural, but a burn test quickly revealed that this was certainly not the case.

    There were a few pleasant surprises too, and, ultimately, I managed to whittle down my fabric stash just a little bit more!

    If you have a mystery piece in your stash, I highly recommend the flame test as a quick way of determining the basic properties of the fabric. A word of waring – just make sure you do this in a well ventilated area – the aromas of burning synthetic are strong, unpleasant, toxic and tend to linger.